The easiest way to make tracing letters in Microsoft Word is to type your letters in a large, simple font and give them a dashed outline with no fill. Select the text, go to Home > Text Effects and Typography (the outlined A) > Outline > Dashes, and pick a dashed line. Then set the Font Color to White so only the dashed outline shows. If you’d rather not format anything, install a free dotted “tracing font” and just type.
Below are both methods, plus how to add handwriting guide lines and print a worksheet that’s ready to use.
Which method should you use?
| Method | Pros | Cons |
|---|---|---|
| Dashed text outline (built into Word) | No downloads. Works with any font. | Outlines trace the edge of each letter, so thick fonts look “hollow” instead of single-stroke. |
| Tracing font | Looks like a real handwriting worksheet with single dotted strokes. Fastest once installed. | You need to download and install a font. Other people need it installed to see it in your file. |
Method 1: Make tracing letters with a dashed outline
- Open a blank document in Word and type your letters, words, or name.
- Select the text and choose a simple, rounded font. Comic Sans MS, Century Gothic, and Arial Rounded MT Bold work well for kids.
- Set a large font size, like 72 or more. You can type a number bigger than the list goes, such as 120, and press Enter.
- With the text still selected, go to Home and click Text Effects and Typography (the A with a blue outline) in the Font group.
- Choose Outline and pick a dark color, like black or gray.
- Open Outline again, choose Dashes, and click a dashed or dotted line.
- Open Outline > Weight and choose 1½ pt or 2¼ pt so the dashes are easy to see when printed.
- Click the arrow next to Font Color and choose White. Now only the dashed outline is visible.
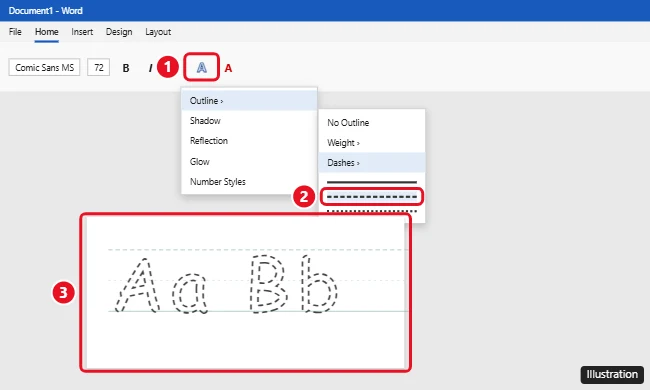
For a cleaner result, use No Fill instead of white. Click the small arrow in the corner of the Font group (or press Ctrl + D), click Text Effects, and under Text Fill choose No fill. This matters if you put the letters on a colored background.
On a Mac: Select the text, choose Format > Font, click Text Effects, and set Text Fill to No Fill and Text Outline to a solid line with a Dash type.
Method 2: Use a tracing font
- Download a free dotted handwriting font. Search for “tracing font” or “dotted print font.” Popular choices include KG Primary Dots and similar dashed print fonts. Check the license, since many are free only for personal or classroom use.
- Unzip the download if needed.
- Right-click the .ttf or .otf file and choose Install (on a Mac, double-click it and click Install Font).
- Close and reopen Word.
- Type your letters, select them, and choose the tracing font from the font list.
Only download fonts from well-known font sites or the designer’s own website. A font file should end in .ttf or .otf. Never run an .exe file that claims to be a font.
If you’ll share the document, the other person needs the same font installed. To avoid this, save the worksheet as a PDF (see below) before you send it.
Add handwriting guide lines
Classic tracing worksheets have a solid top line, a dashed middle line, and a solid baseline. Here’s a quick way to add them:
- Click Insert > Table and insert a 1×3 table (one column, three rows) for each line of letters.
- Select the table, go to Table Design, and click Borders > No Border.
- Click in the first row, then apply Borders > Top Border. Choose a dashed style in Pen Style and apply a Bottom Border to the first row to create the dashed midline.
- Click in the second row and apply a solid Bottom Border for the baseline.
- Drag the row borders so the midline sits at the height of small letters like a and c.
Alternatively, draw lines with Insert > Shapes > Line. Hold Shift while dragging to keep them straight, then change the dash style under Shape Format > Shape Outline > Dashes.
Make a full practice worksheet
- Fill a line fast. Type a letter once, format it, then copy it with Ctrl + C and paste it several times with Ctrl + V.
- Mix solid and dashed letters. Show one solid example at the start of each row so kids can see the finished shape.
- Add a starting dot. Insert a small circle shape at the top of each letter to show where to begin.
- Use Landscape orientation for long names: Layout > Orientation > Landscape.
- Add pictures. Put an image next to each letter, like an apple beside “A,” with Insert > Pictures.
Print or save the worksheet
- Click File > Print to check the preview. Thin dashes can fade on some printers, so increase the outline weight if needed.
- To share it, choose File > Save As and select PDF. The PDF keeps the tracing font and layout even on computers without the font.
Want it laminated for reuse? Slip the printout into a sheet protector and use a dry-erase marker.
Frequently asked questions
Does Word have a built-in tracing font?
No. Word doesn’t include a dotted tracing font, but you can make any font look like one with a dashed text outline, or install a free tracing font.
Can I make tracing letters in Word for the web?
Word for the web has fewer text effect options and can’t use fonts you install on your computer. For the best results, use the Word desktop app, or make the worksheet in the desktop app and open it online afterward.
Why do my letters look hollow instead of dotted?
A text outline traces both edges of every stroke. Use a thinner font, like Century Gothic or a light weight, so the edges sit close together, or switch to a single-stroke tracing font.
How do I make the dots bigger?
Increase the outline Weight under Text Effects and Typography > Outline > Weight, and choose a round dot style under Dashes.

Kermit Matthews is a freelance writer based in Philadelphia, Pennsylvania with more than a decade of experience writing technology guides. He has a Bachelor’s and Master’s degree in Computer Science and has spent much of his professional career in IT management.
He specializes in writing content about iPhones, Android devices, Microsoft Office, and many other popular applications and devices.