To enable .NET Framework 2.0 in Windows 10, you turn on .NET Framework 3.5, which includes versions 2.0 and 3.0. Press Windows key + R, type optionalfeatures, and press Enter. Check .NET Framework 3.5 (includes .NET 2.0 and 3.0), click OK, and choose Let Windows Update download the files for you. Restart if you’re asked to. There’s no separate .NET 2.0 installer for Windows 10 or Windows 11.
If that fails with an error such as 0x800F0906 or 0x800F081F, you can install it from Windows installation media with a single DISM command. Both methods, and the most common fixes, are below.
Why you might need .NET Framework 2.0
Windows 10 and 11 come with .NET Framework 4.8 or later, but 4.x doesn’t run apps built for 2.0, 3.0, or 3.5. Older programs, games, business tools, and some drivers still need those versions. You’ll usually see a message like “An app on your PC needs the following Windows feature: .NET Framework 3.5 (includes .NET 2.0 and 3.0).” Clicking Download and install this feature in that message does the same thing as Method 1.
Method 1: Turn it on in Windows Features
- Press Windows key + R, type optionalfeatures, and press Enter. You can also open Control Panel > Programs > Turn Windows features on or off.
- Check the box for .NET Framework 3.5 (includes .NET 2.0 and 3.0).
- Click OK.
- Choose Let Windows Update download the files for you.
- Wait for the download and install to finish. It can take several minutes. Restart your PC if Windows asks you to.
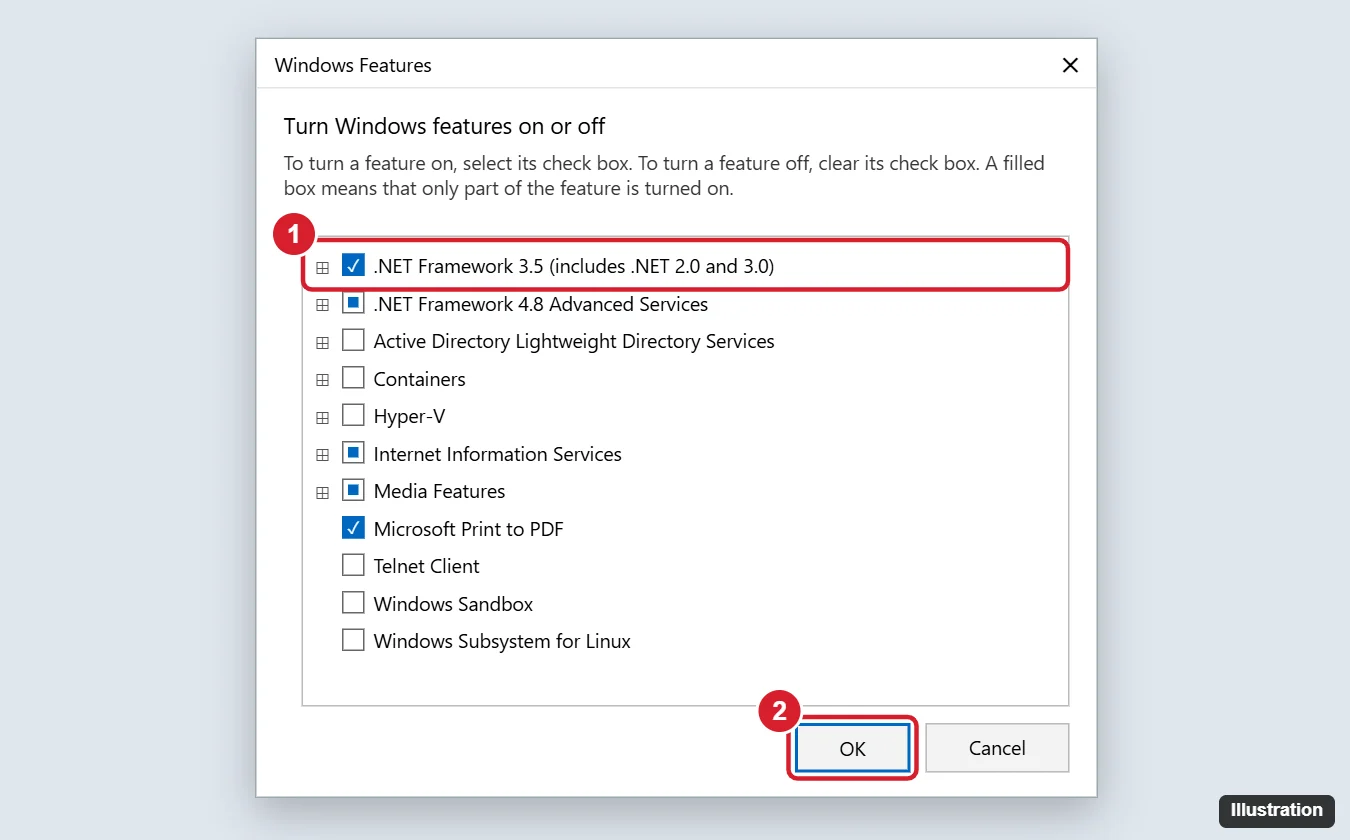
You don’t need to expand the item and check its two sub-options, Windows Communication Foundation HTTP Activation and Non-HTTP Activation. Those are for server software, and most apps don’t need them.
Method 2: Install it with DISM from Windows media
Use this if Windows Update can’t download the files, your PC is offline, or it’s managed by a work server.
- Get Windows 10 installation media that matches your version. You can insert a Windows USB drive, or download the ISO from Microsoft, right-click it, and choose Mount.
- Open File Explorer and note the drive letter of the USB drive or mounted ISO, such as D:.
- Right-click Start and choose Command Prompt (Admin), Windows PowerShell (Admin), or Terminal (Admin).
- Run this command, replacing D: with your drive letter:
DISM /Online /Enable-Feature /FeatureName:NetFx3 /All /LimitAccess /Source:D:\sources\sxs- Wait until you see The operation completed successfully, then restart your PC.
The /LimitAccess switch tells DISM not to contact Windows Update, and /Source points it to the files on the media. If you’re online and just want to try again from the command line, leave out both switches: DISM /Online /Enable-Feature /FeatureName:NetFx3 /All.
How to check that it’s installed
- Open optionalfeatures again. The box next to .NET Framework 3.5 should be checked.
- Or run
DISM /Online /Get-FeatureInfo /FeatureName:NetFx3as an administrator. It should say State : Enabled.
How to fix common .NET Framework 3.5 errors
| Error | What it usually means | What to try |
|---|---|---|
| 0x800F0906 | Windows couldn’t download the files | Check your internet connection, run Windows Update, and try again. Or use Method 2. |
| 0x800F081F | Windows couldn’t find the source files | Use Method 2 and make sure the media matches your Windows version and edition. |
| 0x800F0907 | A policy is blocking the download | Change the Group Policy setting below, or use Method 2. |
| 0x800F0922 | The install couldn’t finish | Restart, install pending updates, then try again. |
Allow downloads on PCs managed by a work server
If your PC gets updates from a company server (WSUS), it may not be allowed to download optional features. On Windows 10 Pro or higher, and only if you manage the PC yourself:
- Press Windows key + R, type gpedit.msc, and press Enter.
- Go to Computer Configuration > Administrative Templates > System.
- Double-click Specify settings for optional component installation and component repair.
- Choose Enabled, check Download repair content and optional features directly from Windows Update instead of Windows Server Update Services (WSUS), and click OK.
- Try Method 1 again.
On a work or school computer, ask your IT department instead of changing policies yourself.
Other fixes
- Install all pending updates in Settings > Update & Security > Windows Update, restart, and try again.
- Run
sfc /scannowand thenDISM /Online /Cleanup-Image /RestoreHealthas an administrator to repair system files. - Turn off the feature, restart, and turn it back on.
Does this work on Windows 11?
Yes. The steps are the same on current versions of Windows 11. Microsoft has said that future Windows releases may no longer include .NET Framework 3.5 as a built-in optional feature and will offer it as a separate download instead, so if you don’t see it in Windows Features, check Microsoft’s .NET download page.
Frequently asked questions
Can I download .NET Framework 2.0 by itself?
Not for Windows 10 or 11. The old standalone 2.0 installers are for Windows XP and earlier. Enable .NET Framework 3.5 instead, which includes 2.0.
Will enabling .NET 3.5 break my newer .NET apps?
No. .NET Framework 3.5 and 4.x are installed side by side, and each app uses the version it was built for.
Is .NET Framework 2.0 safe to use?
Yes. When you enable it through Windows, it gets security updates through Windows Update like the rest of the system. Microsoft has announced that .NET Framework 3.5 SP1 will be supported until January 2029.
How much space does it take?
Usually a few hundred megabytes.

Kermit Matthews runs Live2Tech from just outside Philadelphia. He started on a university help desk, spent years as the IT person for small businesses, and has been writing tech guides full time since 2020. Each guide is checked on a device he owns, and re-checked when a menu moves. More about Kermit.