Windows 10 doesn’t have a setting to change mouse polling rate. The polling rate is set by the mouse itself, so you change it in the manufacturer’s software (for example, Logitech G HUB, Razer Synapse, Corsair iCUE, or SteelSeries GG) or with a button on the mouse. Choose 1000 Hz for most gaming mice, or a lower rate to save battery on wireless mice.
Windows 10 reached end of support on October 14, 2025. Consumer Extended Security Updates (ESU) now run until October 12, 2027. The same steps apply on Windows 11.
Quick Answer
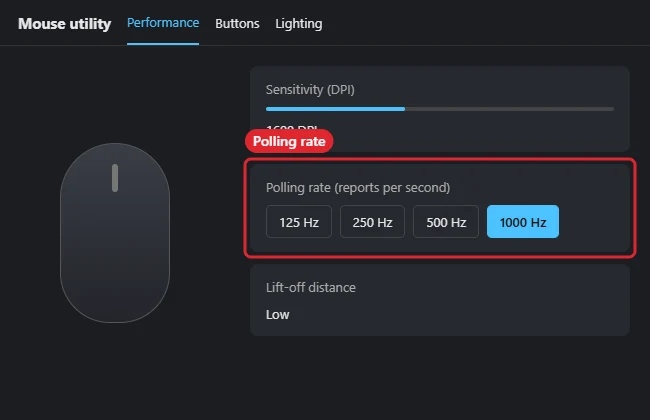
Open your mouse maker’s app > select the mouse > Performance or Settings > Polling rate (or Report rate) > choose 125, 500, or 1000 Hz.
What Polling Rate Means
Polling rate is how often the mouse reports its position to the PC. At 1000 Hz, it reports every 1 millisecond. A higher rate can make movement feel smoother, but it uses more CPU time and battery.
Change the Polling Rate in the Mouse Software
- Find your mouse model on the bottom label or box.
- Download the maker’s configuration app from its official website.
- Open the app and select your mouse.
- Look for Polling rate, Report rate, or a Performance section.
- Pick a rate and save it to the mouse’s onboard memory if the app offers that option.
Change It Without Software
Some mice have a button or switch on the bottom for polling rate, or a key combination held while plugging in. Check the manual for your model. Basic office mice usually run at a fixed 125 Hz and can’t be changed.
Which Rate to Choose
| Rate | Report interval | Good for |
|---|---|---|
| 125 Hz | 8 ms | Office work, saving battery |
| 500 Hz | 2 ms | Balanced, older PCs |
| 1000 Hz | 1 ms | Most gaming |
| 2000–8000 Hz | 0.5–0.125 ms | Competitive gaming on fast PCs and high-refresh monitors |
Very high rates can cause stutter in some games or on slower CPUs. If you see stutter, drop back to 1000 Hz.
Test Your Polling Rate
Online mouse rate checkers measure the rate while you move the mouse quickly in circles. Results vary a little; an average close to your setting is normal.
Troubleshooting
- No polling rate option in the app: Your mouse doesn’t support changing it.
- The setting resets after restarting: Save it to onboard memory, or keep the app running at startup.
- Wireless mouse battery drains fast: Lower the rate to 500 Hz or less.
- Games stutter after raising the rate: Lower it, and check that the game isn’t limited by the GPU; see how to check GPU usage.
Avoid registry edits or USB “overclocking” tools that claim to force higher rates. They can make input unstable and aren’t supported. If an overlay is cluttering your game while testing, see how to turn off an FPS counter.
Frequently Asked Questions
Is there a polling rate setting in Mouse Properties?
No. Control Panel’s mouse settings cover buttons, pointer speed, and wheel scrolling, not polling rate.
Should I use 1000 Hz or 2000 Hz?
1000 Hz is plenty for most players. Higher rates help only on fast systems and high-refresh displays.
Does polling rate affect DPI?
No. DPI is sensitivity (how far the pointer moves); polling rate is how often the mouse reports.
Summary
- Install your mouse maker’s software.
- Find the Polling rate or Report rate setting.
- Choose 1000 Hz for gaming or lower for battery.
- Save it to the mouse and test.

Kermit Matthews is a freelance writer based in Philadelphia, Pennsylvania with more than a decade of experience writing technology guides. He has a Bachelor’s and Master’s degree in Computer Science and has spent much of his professional career in IT management.
He specializes in writing content about iPhones, Android devices, Microsoft Office, and many other popular applications and devices.