Kerning adjusts the space between specific pairs of letters, such as A and V, so large text looks evenly spaced. Word applies it automatically once you turn it on, but it is off by default. It is most noticeable in headings, titles, and logos rather than body text.
Quick Answer
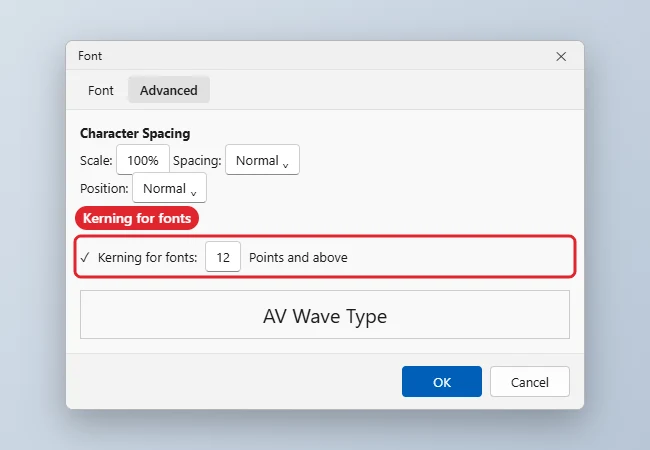
Select the text, open the Font dialog with Ctrl+D, click the Advanced tab, check Kerning for fonts, set the point size (for example 12) in Points and above, and click OK.
How to Adjust Kerning in Word
- Select the text you want to kern, or press Ctrl+A for the whole document.
- Open the Font dialog: use the Ctrl+D shortcut, or the dialog launcher at the bottom-right of the Home tab’s Font section.
- Open the Advanced tab.
- Tick the Kerning for fonts box, then type a minimum size in Points and above. Text at that size or larger is kerned.
- Click OK. For manual control, change Spacing to Expanded or Condensed and set a point value.
Kerning vs Character Spacing
| Setting | What it changes |
|---|---|
| Kerning for fonts | Automatic spacing between specific letter pairs |
| Spacing: Expanded | Adds equal space between all letters |
| Spacing: Condensed | Removes equal space between all letters |
| Scale | Stretches or squeezes the letters themselves |
Troubleshooting
- Nothing seems to change: kerning only affects fonts that include kerning pairs, and the effect is small at normal sizes. Try a larger heading.
- The setting does not stick for new documents: open the Font dialog, set kerning, and click Set As Default.
- For uniform spacing changes, see how to change character spacing in Word.
- Also read how to change spacing between letters in Word.
Frequently Asked Questions
What size should I use for kerning?
Many designers pick 12 or 14 points so headings are kerned but body text stays unchanged. Any size works.
Does kerning change the font size?
No. It only adjusts the gaps between letter pairs.
Is kerning available in Word for Mac?
Yes. Use Format, Font, Advanced to find the same option.
Summary
- Select the text.
- Open the Font dialog with Ctrl+D.
- Check Kerning for fonts on the Advanced tab.
- Set the minimum point size and click OK.

Kermit Matthews is a freelance writer based in Philadelphia, Pennsylvania with more than a decade of experience writing technology guides. He has a Bachelor’s and Master’s degree in Computer Science and has spent much of his professional career in IT management.
He specializes in writing content about iPhones, Android devices, Microsoft Office, and many other popular applications and devices.