To set up a Google Nest Hub, plug it in and open the Google Home app on your phone. Tap Add, then Device, and scan the QR code shown on the Hub’s screen. Once the app says Connected, choose a room, join your Wi-Fi network and follow the prompts. Expect it to take a little longer if the Hub downloads a software update during setup.
This guide covers the Nest Hub (1st gen), Nest Hub (2nd gen) and Nest Hub Max. It explains which optional features each model offers during setup and how to fix the most common setup problems.
Quick Answer
- Plug in the Nest Hub and wait for the setup screen.
- On your phone, turn on Bluetooth, then open the Google Home app.
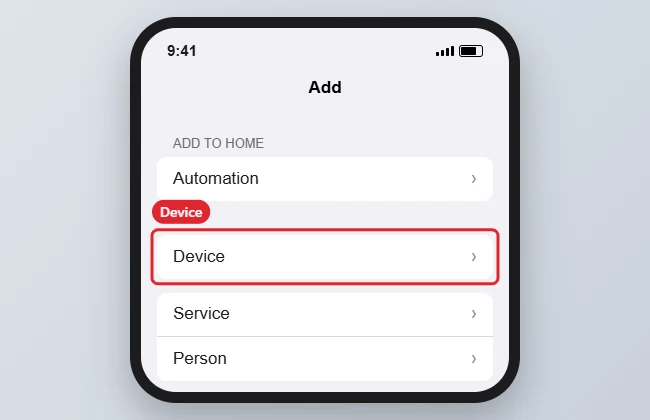
- Tap Add (top of the screen), then Device.
- Scan the QR code on the Hub’s screen, or use the setup code option.
- When you see Connected, choose a room and your Wi-Fi network.
- Follow the in-app prompts for your voice assistant, Voice Match, Photo Frame and other features.
In This Guide
- What you need before you start
- Which Nest Hub do you have?
- How to set up a Google Nest Hub
- Optional features you can set up
- What to do after setup
- Troubleshooting
- Frequently Asked Questions
What You Need Before You Start
This guide reflects Google’s setup instructions as of September 2026. The Google Home app changes often, so a few labels may look slightly different on your phone. The overall flow stays the same.
- A Google Nest Hub plus its included power adapter and a nearby outlet. The Hub has no battery, so it must stay plugged in.
- A Google Account. A personal Gmail account works best. Some features, such as Sleep Sensing, don’t work with Google Workspace (work or school) accounts.
- A phone or tablet with the latest Google Home app. Google’s current requirements are Android 9.0 or later, or iOS 17.0 or later on an iPhone or iPad.
- Bluetooth turned on on your phone. The app uses Bluetooth to find the Hub during setup.
- Location and Local Network access for the Google Home app (iPhone and iPad). If you declined these permissions earlier, turn them back on in the iOS Settings app under Google Home.
- Your Wi-Fi network name and password. The Hub supports 2.4 GHz and 5 GHz networks. If you plan to use a 5 GHz network, your phone must also support 5 GHz.
Networks that won’t work: Google says its speakers and displays can’t connect to networks that make you sign in on a web page (called a captive portal, common in hotels, dorms and airports). They also can’t connect to enterprise networks that use 802.1x/RADIUS logins (often labeled WPA2-Enterprise). Mobile hotspots and guest networks may work but aren’t recommended, because they can drop out or run into data limits.
Used or secondhand Hub? If the Hub was set up before, by you or a previous owner, factory reset it first. See our guide on how to reset a Google Nest device, or jump to the reset question in the FAQ below.
Which Nest Hub Do You Have?
Setup works the same way on every model. The optional features offered during setup depend on your hardware.
| Model | Screen | Camera | Model-specific features |
|---|---|---|---|
| Google Nest Hub (1st gen) | 7-inch, 1024 x 600 | No | Photo Frame, voice control, smart home controls |
| Google Nest Hub (2nd gen) | 7-inch, 1024 x 600 | No | Soli radar sensor for Motion Sense (Quick Gestures and Sleep Sensing), Thread border router, Ambient EQ light sensor |
| Google Nest Hub Max | 10-inch, 1280 x 800 | Yes, 6.5 MP | Face Match, camera sensing, video calls, Nest Cam feature |
If you’re not sure which 7-inch model you have, check the device’s settings in the Google Home app after setup, or look at the original box. The model name is also shown in the Google Store order if you bought it there. The original 1st gen Hub was sold as the Google Home Hub before Google renamed it.
How to Set Up a Google Nest Hub
These steps follow Google’s official setup flow for smart speakers and displays. Keep your phone within about 5 to 20 feet of the Hub during the whole process.
- Plug in the Nest Hub. Connect the included power adapter to the back of the Hub and plug it into an outlet. If there’s a protective film on the screen, peel it off. Expected result: After about a minute, the Hub shows a welcome screen asking you to set it up in the Google Home app.
- Open the Google Home app on your phone. Install it from the Google Play Store or Apple App Store if you don’t have it. Sign in with the Google Account you want to use with the Hub. If this is your first Google device, the app will ask you to create a home. Give it a name, such as “Home”, and add an address if you want location-based features like local weather.
- Start adding the device. Tap Add at the top of the app’s main screen, then tap Device. Expected result: The app opens a scanner or asks how you want to add the device.
- Scan the QR code on the Hub. Point your phone’s camera at the QR code on the Hub’s screen. If scanning fails, choose Use setup code and type the code shown on the Hub. You can also choose Add a different way to have the app search for nearby devices.
- Wait for the connection. The app connects to the Hub over Bluetooth. Expected result: You see a Connected confirmation. If the app asks you to confirm a code or sound on the Hub, check that it matches and confirm.
- Choose a room. Pick where the Hub lives, such as Bedroom or Kitchen, or create a new room. The room name helps you control it later (“Hey Google, turn off the kitchen display”).
- Connect to Wi-Fi. Select your Wi-Fi network from the list and enter the password. If your network isn’t listed, see the troubleshooting section below. Expected result: The Hub joins the network and may start downloading a software update. Leave it plugged in while it updates. This can take several minutes, and the Hub may restart.
- Accept the terms and choose your voice assistant settings. Depending on your region and whether your home has switched, the app may offer Google Assistant or Gemini for Home. Review the privacy options on each screen and choose the ones you’re comfortable with.
- Set up the optional features. The app walks you through extras such as Voice Match, personal results, Photo Frame, music and video services, and calling. Model-specific features like Sleep Sensing or Face Match appear only on supported Hubs. You can skip any of them and set them up later.
- Finish and test. When the app says setup is complete, say “Hey Google, what’s the weather?” Expected result: The Hub answers out loud and shows the forecast on screen.
Google’s full reference for this process is the official Google smart speaker and display setup guide. It has separate Android and iPhone versions with the current requirements.
Optional Features You Can Set Up
You don’t have to enable everything on day one. Here’s what each option does and which Hubs support it, so you can decide what’s worth turning on.
Voice Match and personal results
Voice Match teaches the Hub to recognize your voice, so it can give you personal information such as your calendar, reminders and commute. Setup asks you to say a few phrases. With personal results turned on, the Hub can show that information when it recognizes you. Each person in the home can set up their own Voice Match from their own phone. That matters in shared homes: without Voice Match, anyone nearby could ask about your calendar.
Photo Frame
Photo Frame turns the Hub into a digital picture frame when it’s idle. You can pick albums from Google Photos, choose art galleries, or show only the clock. For a detailed walkthrough, see how to add pictures to a Google Home Hub.
Music, video and calling services
During setup, the app offers to link services such as a music provider or video apps, and to set up calling. Linking your preferred music service lets you say “play some jazz” without naming an app every time. Available services vary by country. You can add more later from the Google Home app.
Sleep Sensing (Nest Hub 2nd gen only)
Sleep Sensing uses the 2nd-gen Hub’s Soli radar sensor to track sleep from your nightstand without a wearable. It’s offered as a free preview. It needs Motion Sense turned on, a personal Google Account and the Google Fit app, and you calibrate your sleeping area during setup. The Hub has no camera, and Google says audio for features such as cough and snore detection is processed on the device. Details are in Google’s Sleep Sensing help page.
Quick Gestures (Nest Hub 2nd gen)
With Motion Sense on, the 2nd-gen Hub can respond to simple hand gestures made in front of the screen, for example to pause media or dismiss an alarm without touching it. The supported gestures are listed in the Hub’s Motion Sense settings. This is handy in a kitchen when your hands are messy.
Face Match and camera sensing (Nest Hub Max only)
The Hub Max has a front camera. Face Match lets it recognize enrolled faces and show personal information without a voice command. Camera sensing covers related features that use the camera to detect presence. Both are optional, and you can decline them during setup. You can turn camera features on or off later in the Hub Max’s settings in the Google Home app.
Gemini for Home
Google is rolling out Gemini for Home, its newer AI voice assistant, as a replacement for Google Assistant on Nest speakers and displays. That includes the Nest Hub (1st and 2nd gen) and the Nest Hub Max. As of September 2026 it’s available through early access in several countries, including the US. Basic features are free. Advanced features such as Gemini Live need a Google Home Premium subscription. Google warns that once your home switches to Gemini for Home, you can’t switch back to Google Assistant. The switch also applies to everyone in the home, so talk to your household before you opt in. See Google’s Gemini for Home overview for supported devices and regions.
What to Do After Setup
A few quick tasks make the Hub more useful from day one.
- Find the Hub’s settings. In the Google Home app, go to the Home tab, open All devices, then touch and hold the Hub’s tile and tap Settings. This is where you change the device name, room, display options, Wi-Fi and more. Menu names can vary slightly by app version.
- Explore the touchscreen. Swipe on the Hub’s screen to find quick settings such as brightness and volume, plus shortcuts to your smart home devices. The exact gestures and layout can vary with software updates.
- Set up automations. Use the Automations tab in the Google Home app to build routines, such as a bedtime routine that dims the screen and turns off the lights.
- Check for updates. Hubs update automatically when idle and connected. If something seems off right after setup, see how to update a Google Nest device.
- Place it well. Keep the Hub where it can hear you, away from loud appliances. For Sleep Sensing, the Hub must sit close to your bed. The app’s calibration step tells you if it needs adjusting.
Troubleshooting
Setup freezes or won’t finish
Google’s first fix is simple: unplug the Hub, wait 10 seconds, plug it back in, then start setup again in the app. Also make sure your phone stays close to the Hub (about 5 to 20 feet) the whole time, and don’t let your phone go to sleep mid-setup.
The Google Home app can’t find the Hub
- Confirm Bluetooth is on and the Google Home app has Location permission. On iPhone and iPad, also confirm Local Network access.
- Restart the Hub (unplug for 10 seconds).
- Force-close the Google Home app and reopen it, then tap Add and Device again.
- Update the Google Home app from your app store.
- If the Hub was previously set up, factory reset it first.
Your Wi-Fi network doesn’t appear in the list
Move closer to your router. Google suggests about 15 to 20 feet during setup. If you’re using a 5 GHz network, make sure your phone supports 5 GHz. If your network is hidden (it doesn’t broadcast its name), tap the arrow beside the network list, choose Other, type the exact network name, pick the security type and enter the password. Google’s setup troubleshooting page covers these fixes in more detail.
The Hub won’t connect even with the right password
Double-check the password (it’s case-sensitive). Then confirm your network isn’t a captive portal or enterprise network, which aren’t supported. Restarting your router can also clear up a stuck connection. If you recently changed routers, try again after the router has fully restarted.
Voice Match doesn’t recognize you
Retrain your voice model from the Google Home app. Look in your profile or assistant settings for Voice Match. Speak at a normal volume from where you usually stand. Make sure each person enrolls from their own Google Account.
Nothing works: start fresh
As a last resort, factory reset the Hub and run setup again. On every Nest Hub model, press and hold both volume buttons on the back for about 10 seconds. A reset erases your settings from the device and can’t be undone, so use it only when other fixes fail. Google’s factory reset instructions list the method for each device.
Related: turn on the camera on a Google Nest Hub.
Frequently Asked Questions
Can I set up a Nest Hub without a phone?
No. Setup requires the Google Home app on an Android phone, iPhone or tablet. After setup, you can control many things by voice or on the Hub’s touchscreen.
Can I factory reset a Nest Hub from the Google Home app?
No. Google says factory resets for speakers and displays can’t be done by voice or in the app. On the Nest Hub (1st and 2nd gen) and Nest Hub Max, press and hold both volume buttons on the back for about 10 seconds.
Does the Nest Hub have a camera?
The Nest Hub (1st gen) and Nest Hub (2nd gen) have no camera. Only the Nest Hub Max has one, which it uses for Face Match, video calls and camera sensing.
Does the Nest Hub need 2.4 GHz Wi-Fi?
No. The Nest Hub supports both 2.4 GHz and 5 GHz Wi-Fi. If you connect to 5 GHz, your phone also needs 5 GHz support during setup.
Can more than one person use the same Nest Hub?
Yes. Invite household members to your home in the Google Home app. Each person can set up Voice Match (and Face Match on the Hub Max) so the Hub shows their own calendar and reminders.
Do I need a subscription to use a Nest Hub?
No. Setup and everyday features are free. Google Home Premium (formerly Nest Aware) is optional. It adds things like longer camera video history for Nest cameras and advanced Gemini for Home features.
Can I move my Nest Hub to a new Wi-Fi network later?
Yes. In the Google Home app, open the Hub’s settings, go to the Wi-Fi section and choose to forget the current network. Then add the Hub again using Add and Device. Google’s steps for moving to a new network apply to all Nest speakers and displays.
Summary
- Plug in the Nest Hub and turn on Bluetooth on your phone.
- In the Google Home app, tap Add, then Device.
- Scan the QR code on the Hub’s screen or use the setup code.
- After Connected appears, choose a room and join your Wi-Fi network.
- Set up Voice Match, Photo Frame and services, plus Sleep Sensing (2nd gen) or Face Match (Hub Max) if you want them.
- If setup stalls, restart the Hub. Use a factory reset only as a last resort.
Next step: set up Photo Frame with your favorite Google Photos albums so the Hub shows your pictures between tasks.

Kermit Matthews is a freelance writer based in Philadelphia, Pennsylvania with more than a decade of experience writing technology guides. He has a Bachelor’s and Master’s degree in Computer Science and has spent much of his professional career in IT management.
He specializes in writing content about iPhones, Android devices, Microsoft Office, and many other popular applications and devices.