The built-in Microsoft Defender Firewall in Windows 11 blocks unwanted network connections. Sometimes you need to turn it off briefly, for example to test whether it’s blocking a game, a printer, file sharing, or an app you’re developing, or because you’re installing a different firewall. This guide shows how to turn it off (and back on) in Windows Security, Control Panel, and the command line, plus the safer alternative of allowing just one app through.
Quick Answer
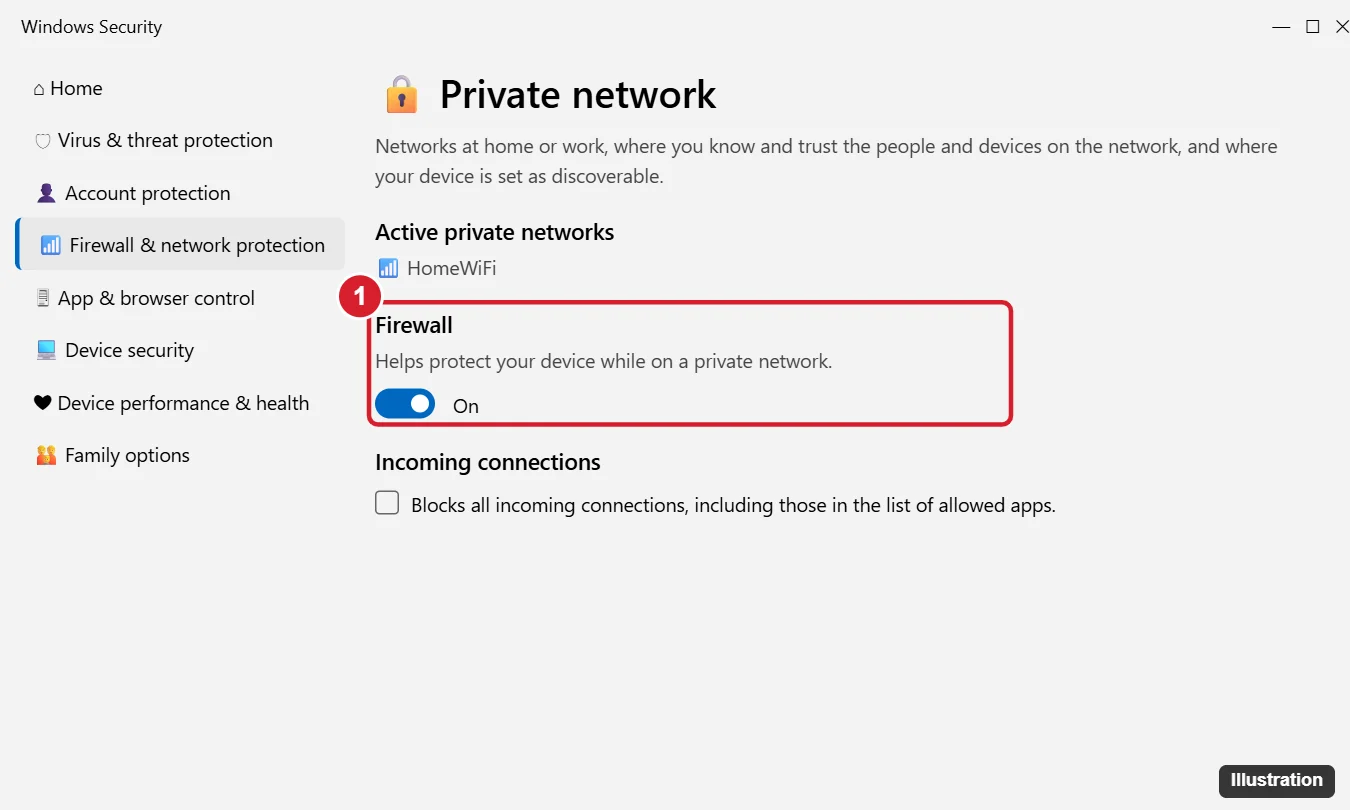
Open Windows Security (search for it in Start), click Firewall & network protection, select the network marked (active), usually Private network or Public network, and switch Microsoft Defender Firewall to Off. Click Yes at the prompt. Turn it back on the same way when you’re done.
Before You Turn It Off
- It’s a security risk. Without a firewall, other devices on the network can reach services on your PC. Never leave it off on public Wi-Fi.
- Usually you don’t need to. If one app is blocked, allowing that app is safer (see below).
- Turning it off is per network type. Windows has separate firewall settings for Domain (work networks), Private (home), and Public networks.
- You need an administrator account.
Method 1: Windows Security (Recommended)
- Click Start, type Windows Security, and open it. (Or go to Settings > Privacy & security > Windows Security > Firewall & network protection.)
- Click Firewall & network protection.
- Click the network that says (active).
- Turn off the Microsoft Defender Firewall switch.
- Click Yes in the User Account Control prompt.
Repeat for other network types if needed. Windows shows a warning on the Firewall page and in notifications while it’s off.
Method 2: Control Panel
- Open Control Panel and go to System and Security > Windows Defender Firewall.
- Click Turn Windows Defender Firewall on or off on the left.
- Select Turn off Windows Defender Firewall (not recommended) under Private and/or Public network settings.
- Click OK.
Method 3: Command Prompt or PowerShell
Open Terminal (Admin) from the Windows + X menu, then run one of these:
- Turn off for all profiles: netsh advfirewall set allprofiles state off
- Turn off for the current profile only: netsh advfirewall set currentprofile state off
- PowerShell: Set-NetFirewallProfile -Profile Domain,Public,Private -Enabled False
To turn it back on, use state on or -Enabled True. Check the status with netsh advfirewall show allprofiles.
Safer Alternative: Allow One App Through the Firewall
- In Windows Security > Firewall & network protection, click Allow an app through firewall.
- Click Change settings.
- Find the app and check Private (and Public only if necessary). If it isn’t listed, click Allow another app and browse to its .exe file.
- Click OK.
For servers or games that need a specific port, see our guide on opening ports in Windows 11.
How to Turn the Firewall Back On
- In Windows Security > Firewall & network protection, click Restore settings or Turn on next to any network that’s off.
- Or run netsh advfirewall set allprofiles state on.
- To undo all custom rules, click Restore firewalls to default on the Firewall page.
Using Another Firewall
If you install a security suite with its own firewall, it usually turns off the Windows firewall automatically and shows as the active firewall in Windows Security. You don’t need to disable it manually.
Troubleshooting
- The switch is grayed out or says “managed by your organization”: A work or school policy controls the firewall. Contact your IT team.
- The problem continues with the firewall off: The firewall isn’t the cause. Check antivirus software, your router, or the app’s settings, then turn the firewall back on.
- Firewall turns back on by itself: Group Policy, security software, or a Windows update may re-enable it, which is by design.
Summary
- Open Windows Security > Firewall & network protection.
- Select the (active) network and switch the firewall Off.
- Prefer Allow an app through firewall when only one app is blocked.
- Turn the firewall back on as soon as you’re done testing.

Kermit Matthews is a freelance writer based in Philadelphia, Pennsylvania with more than a decade of experience writing technology guides. He has a Bachelor’s and Master’s degree in Computer Science and has spent much of his professional career in IT management.
He specializes in writing content about iPhones, Android devices, Microsoft Office, and many other popular applications and devices.