Quick Access is the first thing you see in Windows 10’s File Explorer. It lists pinned folders, frequently used folders, and recent files, which some people find cluttered or a privacy concern on shared PCs. Windows doesn’t have an off switch for it, but you can make File Explorer open to This PC, stop it from showing recent items, clear its history, unpin folders, and even hide it from the navigation pane completely with a registry change. This guide covers each option, from simplest to most thorough.
Quick Answer
In File Explorer, click View > Options. On the General tab, set Open File Explorer to to This PC. Under Privacy, uncheck both Show recently used files and Show frequently used folders, and click Clear. Then click OK.
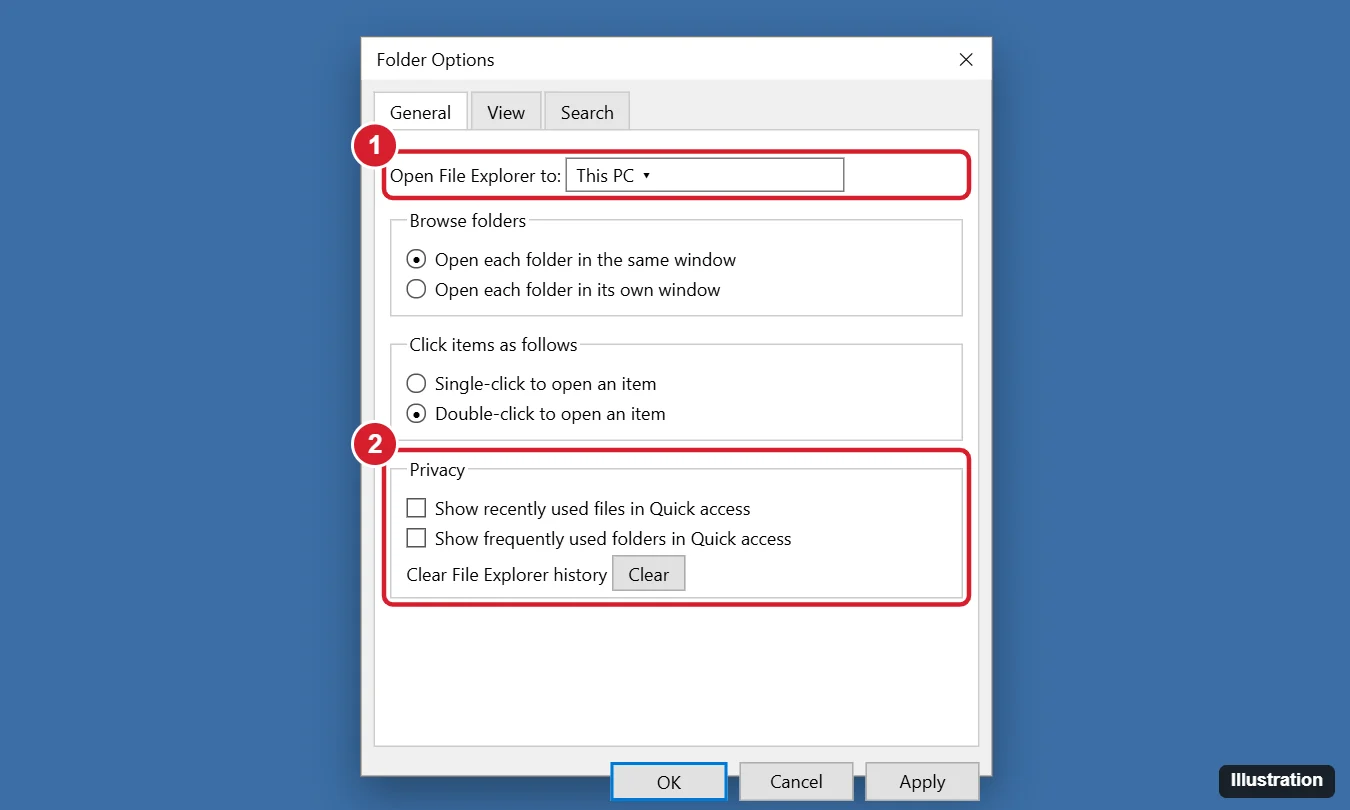
Your Options at a Glance
| Goal | Method | Difficulty |
|---|---|---|
| Stop opening to Quick Access | Open File Explorer to This PC | Easy |
| Hide recent files and folders | Uncheck the Privacy options and clear history | Easy |
| Remove pinned folders | Unpin from Quick access | Easy |
| Remove Quick Access from the sidebar entirely | Registry change (HubMode) | Advanced |
Step 1: Open File Explorer to This PC
- Open File Explorer (Windows + E).
- Click the View tab, then Options (or File > Change folder and search options).
- On the General tab, set Open File Explorer to to This PC.
- Click Apply.
Step 2: Stop Showing Recent Files and Frequent Folders
- In the same Folder Options window, under Privacy, uncheck Show recently used files in Quick access.
- Uncheck Show frequently used folders in Quick access.
- Click Clear next to Clear File Explorer history.
- Click OK.
Quick Access now shows only folders you pin yourself.
Step 3: Unpin Folders
In the left pane, expand Quick access, right-click each pinned folder (it has a pin icon), and choose Unpin from Quick access. To remove a default folder that isn’t pinned, choose Remove from Quick access.
This requires editing the registry. Back it up first (File > Export in Registry Editor) and follow the steps exactly.
- First complete Step 1, so File Explorer opens to This PC. Otherwise File Explorer may show errors when opening.
- Press Windows + R, type
regedit, and press Enter. - Go to
HKEY_LOCAL_MACHINE\SOFTWARE\Microsoft\Windows\CurrentVersion\Explorer. - Right-click Explorer and choose New > DWORD (32-bit) Value. Name it
HubMode. - Double-click HubMode, set the value to
1, and click OK. - Close all File Explorer windows and reopen File Explorer, or restart the PC.
To bring Quick Access back, delete HubMode or set it to 0. Future Windows updates may change or undo this behavior.
Troubleshooting
Recent files still appear
Also check Settings > Personalization > Start and turn off Show recently opened items in Jump Lists on Start or the taskbar and in File Explorer Quick Access.
File Explorer won’t open after the registry change
Set Open File Explorer to This PC (Step 1), or delete the HubMode value.
Quick Access is slow or shows errors
Clear its history (Step 2). If the problem persists, delete the files in %AppData%\Microsoft\Windows\Recent\AutomaticDestinations. This resets Quick Access and jump lists.
Frequently Asked Questions
Does removing Quick Access delete my files?
No. Quick Access only shows shortcuts. Your files stay where they are.
Is this the same in Windows 11?
Mostly. In Windows 11, Quick Access is called Home, and the same Folder Options settings apply.
Summary
- Set Open File Explorer to: This PC.
- Turn off recent files and frequent folders, and clear the history.
- Unpin folders you don’t want.
- Use the HubMode registry value to hide Quick Access completely (advanced).

Matthew Burleigh is the head writer at solveyourtech.com, where he covers topics like the iPhone, Microsoft Office, and Google apps. He has a Bachelor’s and Master’s degree in Computer Science and has over 15 years of IT experience.
He has been writing online since 2008 and has published thousands of articles that have been read millions of times.