To remove an administrator account in Windows 11, sign in with a different administrator account, open Settings > Accounts > Other users, select the account, and choose Remove > Delete account and data. If you’d rather keep the account but take away its admin rights, choose Change account type and set it to Standard User.
Windows won’t let you remove the account you’re signed in with, and it must always keep at least one administrator. Back up any files in that account first, because removing it deletes its Desktop, Documents, and other folders.
Quick Answer
From another admin account: Settings > Accounts > Other users > select the account > Remove > Delete account and data.
Before You Start
- Make sure another account on the PC is an administrator. If not, create one or promote an existing account (see Method 2).
- Copy anything you need from the account’s folders in C:\Users\name.
- If the admin account is a Microsoft account you use elsewhere, removing it from this PC doesn’t close the online account.
Method 1: Remove the Account in Settings
- Sign in with a different administrator account.
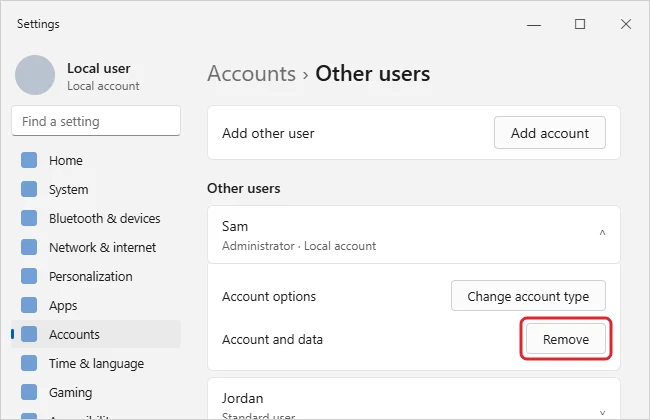
- Open Settings > Accounts > Other users (called Family & other users on some versions).
- Select the account to expand it.
- Next to Account and data, select Remove.
- Select Delete account and data to confirm.
Method 2: Keep the Account, Remove Admin Rights
- In Settings > Accounts > Other users, select the account.
- Select Change account type.
- Choose Standard User and select OK.
Running day to day as a standard user is one of the best ways to harden Windows 11.
Method 3: Command Line or Local Users and Groups
- Command: Open Terminal as administrator and run
net user AccountName /delete. - Pro and higher: Press Windows + R, type
lusrmgr.msc, open Users, right-click the account, and choose Delete. - Control Panel: User Accounts > Manage another account > select it > Delete the account, where you can choose Keep Files to save a copy to the desktop.
What About the Built-in “Administrator” Account?
Windows has a hidden built-in account named Administrator. It’s disabled by default and can’t be deleted, only turned off. If it was turned on, disable it from an admin Terminal with net user Administrator /active:no.
Which Option Should You Use?
| Goal | Option |
|---|---|
| Get rid of an old account and its files | Settings > Remove |
| Keep the person’s account but limit it | Change account type to Standard User |
| Save the account’s files while deleting it | Control Panel > Delete the account > Keep Files |
| Turn off the hidden built-in Administrator | net user Administrator /active:no |
Troubleshooting
- No Remove button: You’re signed in to that account, or you aren’t an administrator. Switch to another admin account.
- It’s the only admin account: Create a new account and make it an administrator first, then remove the old one.
- Work or school account: Accounts added by an organization are removed under Settings > Accounts > Access work or school, or by your IT department.
- Forgot the password for the other admin account? Use legitimate recovery options; see getting back into Windows when you forget your password.
For removing non-admin and Microsoft accounts, see how to remove an account from Windows 11.
Frequently Asked Questions
Can I remove the main account from Windows 11?
Yes, as long as another administrator account exists and you’re signed in with it.
Does removing an account delete its apps?
Apps installed for everyone stay. Apps installed only for that user and its personal files are removed.
Summary
- Sign in as a different administrator.
- Settings > Accounts > Other users > Remove.
- Or change the account to Standard User to keep it.

Kermit Matthews is a freelance writer based in Philadelphia, Pennsylvania with more than a decade of experience writing technology guides. He has a Bachelor’s and Master’s degree in Computer Science and has spent much of his professional career in IT management.
He specializes in writing content about iPhones, Android devices, Microsoft Office, and many other popular applications and devices.