Hardware virtualization (Intel VT-x or AMD-V/SVM) is a firmware setting, so you can’t turn it on from inside Windows 11 alone. But you don’t need to press keys at startup to reach it: go to Settings > System > Recovery > Advanced startup > Restart now, then choose Troubleshoot > Advanced options > UEFI Firmware Settings > Restart. Your PC opens its firmware settings directly. First, check whether it’s already on: open Task Manager > Performance > CPU and look for Virtualization: Enabled.
Many PCs ship with virtualization already enabled. In that case, what you probably need to turn on are the Windows features that use it, such as Virtual Machine Platform, Hyper-V, or WSL, which you can do entirely inside Windows.
Step 1: Check if virtualization is already on
- Press Ctrl + Shift + Esc to open Task Manager.
- Click Performance (the graph icon), then CPU.
- Look at Virtualization below the graph.
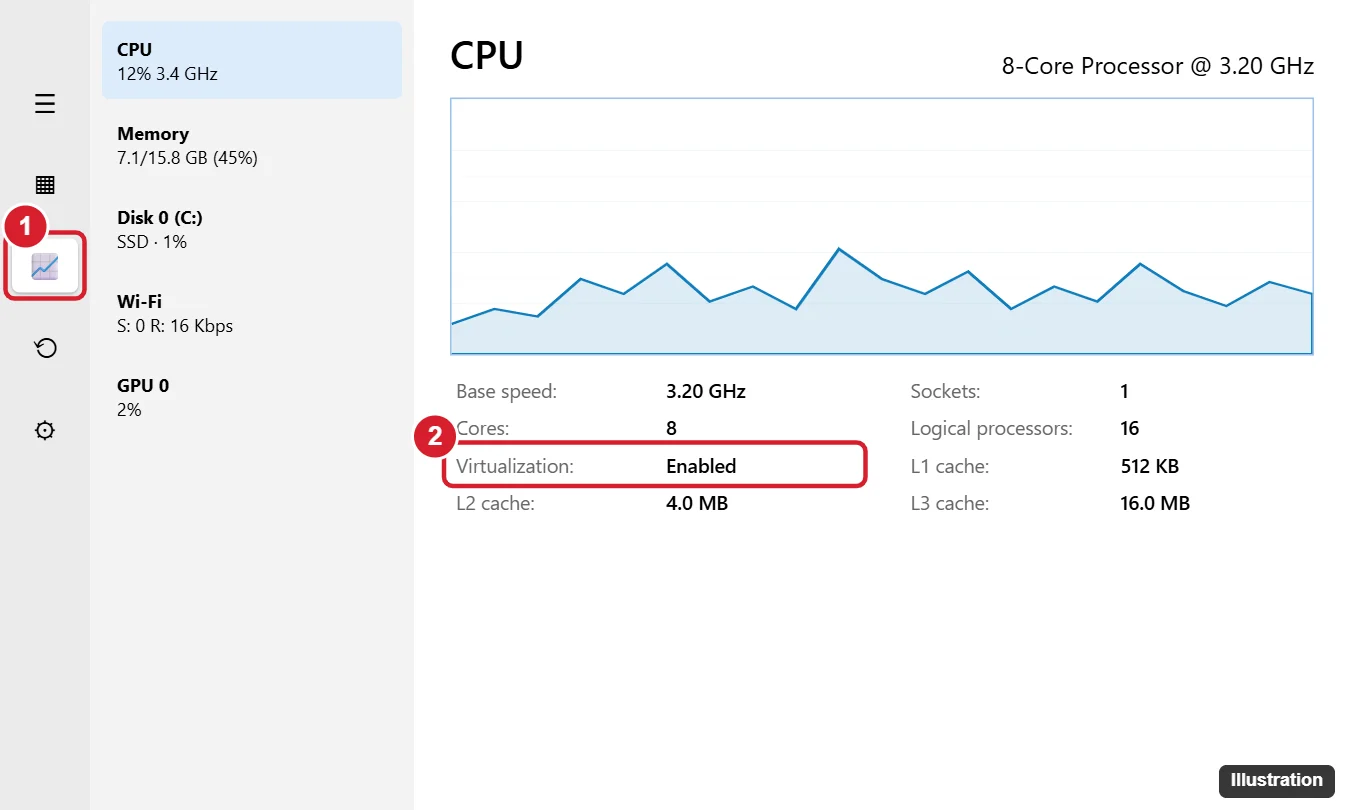
- Enabled: Skip to Step 3 to turn on Windows features.
- Disabled: Go to Step 2.
- Not listed: If Hyper-V is already running, Task Manager may show “Virtualization-based security” details instead. You can also run
systeminfoin Command Prompt and check the Hyper-V Requirements section.
Step 2: Turn on hardware virtualization from Windows (no key presses needed)
- Save your work and open Settings > System > Recovery.
- Next to Advanced startup, click Restart now, then confirm.
- On the blue screen, click Troubleshoot > Advanced options > UEFI Firmware Settings > Restart.
- In the firmware menu, find the setting. It’s often under Advanced, CPU Configuration, Security, or System Configuration, and is called:
- Intel: Intel Virtualization Technology, Intel VT-x, or VMX
- AMD: SVM Mode, AMD-V, or Virtualization
- Set it to Enabled.
- Save and exit, usually with F10. Your PC restarts into Windows.
If you don’t see UEFI Firmware Settings, your PC may be in legacy BIOS mode, and you’ll need to press the BIOS key (often F2, Delete, F10, or Esc) during startup instead. See how to get to BIOS on Windows 11.
Some laptops, especially older budget models, don’t offer a virtualization setting at all. Others let the manufacturer lock it. A firmware update from the manufacturer’s support site sometimes adds the option.
Step 3: Turn on Windows virtualization features
- Press Windows + R, type optionalfeatures, and press Enter. This opens Turn Windows features on or off.
- Check the features you need:
- Virtual Machine Platform: Needed for WSL 2 and some Android and emulator tools.
- Windows Hypervisor Platform: Lets third-party apps like some emulators use Hyper-V.
- Hyper-V: Microsoft’s virtual machine manager. Available on Windows 11 Pro, Enterprise, and Education, not Home.
- Windows Subsystem for Linux: For running Linux tools.
- Windows Sandbox: A disposable desktop for testing apps (Pro and higher).
- Click OK and restart when asked.
To install WSL quickly, open Terminal as administrator and run wsl --install. It turns on the needed features for you.
Which apps need what?
| App or feature | Needs |
|---|---|
| WSL 2 | Hardware virtualization + Virtual Machine Platform |
| Hyper-V virtual machines | Hardware virtualization + Hyper-V (Pro or higher) |
| Windows Sandbox | Hardware virtualization + Windows Sandbox (Pro or higher) |
| VirtualBox or VMware | Hardware virtualization. Recent versions can run alongside Hyper-V. |
| Android emulators | Hardware virtualization, and often Windows Hypervisor Platform |
Note that Microsoft ended the Windows Subsystem for Android in March 2025. See how to use Android apps on Windows 11 for current options.
Troubleshooting
- Still says Disabled after enabling it in firmware: Fully shut down and turn the PC back on. Some systems need a cold boot. Also check for a second related option, like VT-d or IOMMU, which some apps need.
- VirtualBox or an emulator is slow after turning on Hyper-V: Some apps run slower on top of Hyper-V. Update the app, or turn off Hyper-V, Virtual Machine Platform, and Windows Hypervisor Platform if you don’t need them.
- Can’t change firmware settings: There may be a firmware password. On work PCs, your IT department controls this.
Frequently asked questions
Is there any software that enables VT-x without the BIOS?
No. Tools claiming to do this don’t work. The setting lives in your PC’s firmware. The Advanced startup method above is the easiest way to reach it from Windows.
Is it safe to enable virtualization?
Yes. It’s a standard feature used by Windows security features and developer tools. Only change the virtualization setting while you’re in the firmware.
Does enabling virtualization slow down games?
Hardware virtualization itself doesn’t. Some Windows features that use it, like Memory Integrity, may have a small impact on some games.

Kermit Matthews is a freelance writer based in Philadelphia, Pennsylvania with more than a decade of experience writing technology guides. He has a Bachelor’s and Master’s degree in Computer Science and has spent much of his professional career in IT management.
He specializes in writing content about iPhones, Android devices, Microsoft Office, and many other popular applications and devices.