To enable IP routing in Windows 10, open Registry Editor, go to HKEY_LOCAL_MACHINE\SYSTEM\CurrentControlSet\Services\Tcpip\Parameters, double-click IPEnableRouter, change its value from 0 to 1, and restart the PC. Then run ipconfig /all and check that IP Routing Enabled says Yes. You can also turn on forwarding for specific adapters with the PowerShell command Set-NetIPInterface -Forwarding Enabled. For the PC to actually route traffic, other devices also need a route that points to it.
This guide covers what IP routing does, three ways to turn it on, how to add routes so traffic reaches the PC, how to test it, and what to do if you need internet sharing (NAT) instead. The same steps work on Windows 11.
What IP routing does
Normally, Windows only accepts traffic addressed to itself. With IP routing (also called IP forwarding) turned on, a PC with two or more network connections can pass packets between networks, like a basic router. Common uses include lab networks, connecting a virtual machine network to your LAN, and linking two subnets.
IP routing doesn’t translate addresses. If devices on a private subnet need internet access through the PC, you’ll usually want Internet Connection Sharing or NAT instead (see below).
Method 1: Enable IP routing in the registry
- Press Windows + R, type regedit, and press Enter. Click Yes if prompted.
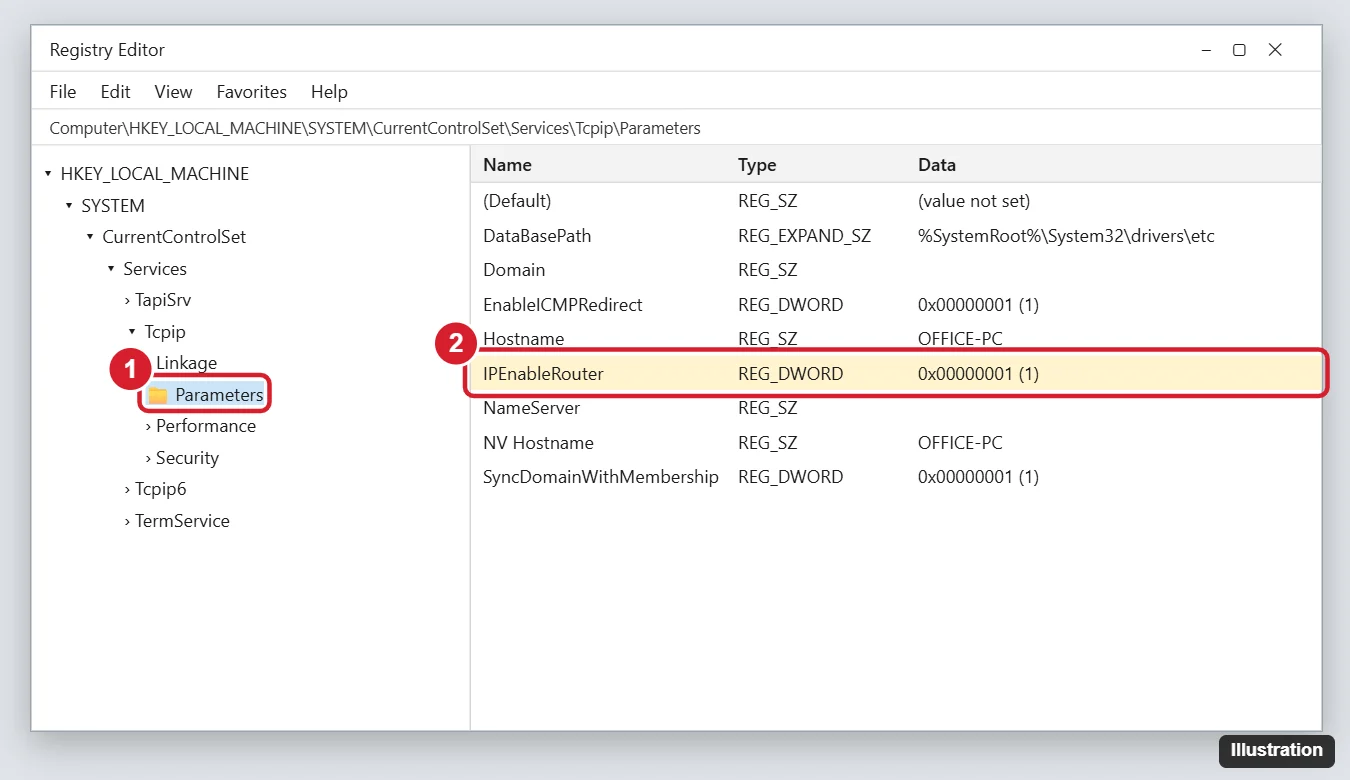
- Go to
HKEY_LOCAL_MACHINE\SYSTEM\CurrentControlSet\Services\Tcpip\Parameters. You can paste the path into the address bar at the top. - Double-click IPEnableRouter. If it doesn’t exist, right-click in the right pane, choose New > DWORD (32-bit) Value, and name it IPEnableRouter.
- Set Value data to 1 and click OK.
- Restart the PC.
For IPv6 forwarding, use the PowerShell method below, since this value applies to IPv4.
Method 2: Enable forwarding with PowerShell
This turns on forwarding per network adapter, takes effect immediately, and doesn’t require the registry.
- Right-click Start and choose Windows PowerShell (Admin).
- List your adapters:
Get-NetIPInterface | Select-Object ifIndex,InterfaceAlias,AddressFamily,Forwarding - Enable forwarding on the adapters that connect the two networks, for example:
Set-NetIPInterface -InterfaceAlias "Ethernet" -Forwarding EnabledandSet-NetIPInterface -InterfaceAlias "Ethernet 2" -Forwarding Enabled - Add
-AddressFamily IPv4orIPv6to limit it to one protocol.
Method 3: Start the Routing and Remote Access service
On some Windows 10 editions, the Routing and Remote Access service can also enable routing.
- Press Windows + R, type services.msc, and press Enter.
- Double-click Routing and Remote Access.
- Set Startup type to Automatic, click Apply, then click Start.
The full Routing and Remote Access console is only available on Windows Server, so on Windows 10 the registry or PowerShell methods are more predictable.
Check that routing is on
Open Command Prompt and run ipconfig /all. Under Windows IP Configuration, IP Routing Enabled should say Yes. For per-adapter status, run Get-NetIPInterface in PowerShell and look at the Forwarding column.
Add routes so traffic reaches the PC
Enabling routing is only half the setup. Devices on each network need to know to send traffic for the other network through your PC.
- On your main router – add a static route, such as 192.168.50.0/24 via 192.168.1.10 (your PC’s LAN address). This is usually the cleanest option.
- On individual devices – on a Windows device, run as administrator:
route -p add 192.168.50.0 mask 255.255.255.0 192.168.1.10 - On devices behind the PC – set their default gateway to the PC’s address on their network.
Test the setup
- From a device on one network, ping a device on the other:
ping 192.168.50.20. - Use
tracert 192.168.50.20to confirm the traffic passes through your PC. - If pings fail, check Windows Firewall on both devices; by default, Windows blocks incoming ping (ICMP echo) requests. Allow File and Printer Sharing (Echo Request – ICMPv4-In) for testing.
Need internet sharing instead?
If devices behind the PC need internet access and your router has no route to their network, use Internet Connection Sharing: open ncpa.cpl, right-click the internet-connected adapter, choose Properties > Sharing, and check Allow other network users to connect through this computer’s Internet connection. ICS provides NAT and DHCP automatically, but it sets the other adapter to a fixed 192.168.137.1 address. For Hyper-V labs, PowerShell’s New-NetNat is another option.
Turn IP routing off
Set IPEnableRouter back to 0 and restart, or run Set-NetIPInterface -InterfaceAlias "Ethernet" -Forwarding Disabled. Leaving routing on when you don’t need it can expose networks to each other.
Frequently asked questions
Does IP routing work over Wi-Fi?
Yes, as long as the PC has two network connections, such as Wi-Fi and Ethernet, or Ethernet and a virtual adapter.
Is enabling IP routing safe?
It’s safe on networks you control, but it can let traffic cross between networks that were meant to be separate. Use Windows Firewall rules to limit what can pass.
Why does ipconfig still show IP Routing Enabled: No?
Restart after changing the registry, and check that you edited the Tcpip (not Tcpip6) Parameters key. Per-adapter forwarding set in PowerShell may work even if this line says No.

Kermit Matthews is a freelance writer based in Philadelphia, Pennsylvania with more than a decade of experience writing technology guides. He has a Bachelor’s and Master’s degree in Computer Science and has spent much of his professional career in IT management.
He specializes in writing content about iPhones, Android devices, Microsoft Office, and many other popular applications and devices.