The camera grid overlays two horizontal and two vertical lines on the iPhone Camera screen, splitting the view into nine equal boxes. It helps you keep horizons straight, line up buildings, and place subjects using the rule of thirds, one of the simplest ways to make photos look more balanced. This guide shows how to turn the grid on or off on the iPhone 14 and every other model, how the separate Level tool works, and how to use the grid for better composition.
Quick Answer
Open Settings > Camera and turn on Grid under Composition. Turn on Level too for a line that helps you keep shots straight. To remove the grid lines, turn Grid off. The lines only appear on screen and never show up in your photos.
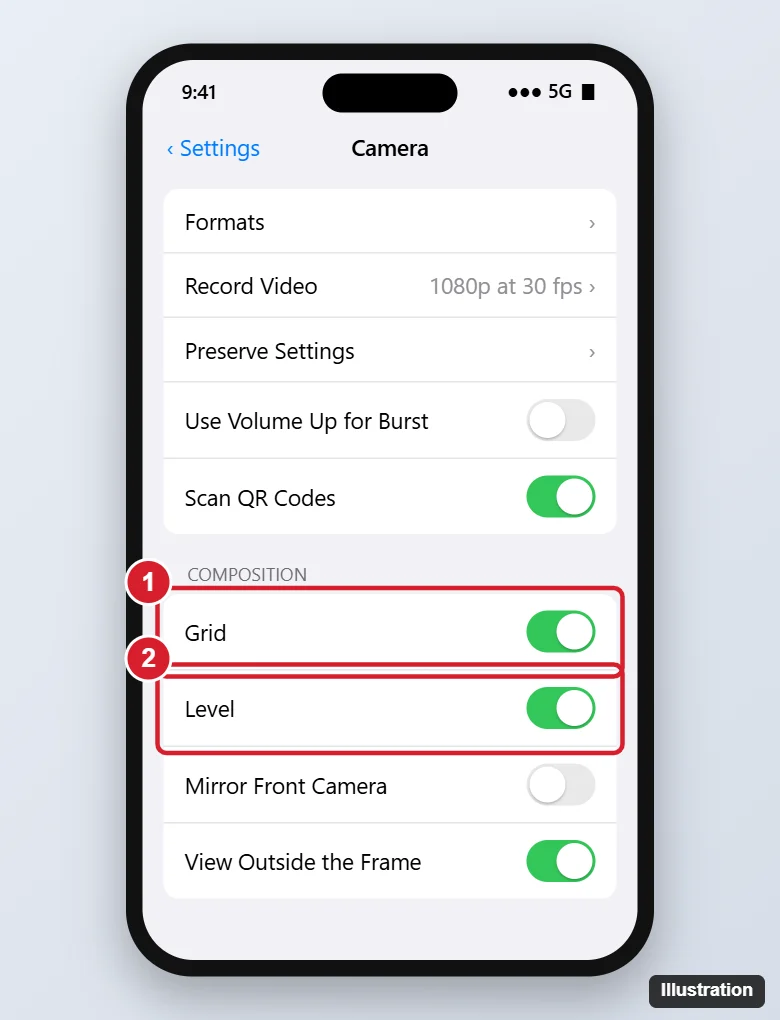
How to Turn On the Camera Grid
- Open the Settings app.
- Scroll down and tap Camera. In some iOS versions, it’s under Settings > Apps > Camera.
- Under Composition, turn on Grid.
- Open the Camera app. The grid lines now appear in Photo, Portrait, Video, and other modes.
The steps are the same on the iPhone 14, 15, 16, and later, older iPhones such as the iPhone 7 and 8, and iPads.
How to Turn Off the Grid (Remove Lines from the Camera)
Go to Settings > Camera and turn off Grid. If you still see a small horizontal line or crosshair, that’s the Level tool. Turn off Level too.
Grid vs. Level
| Tool | What you see | Use it for |
|---|---|---|
| Grid | A 3 x 3 grid over the viewfinder | Rule-of-thirds composition, lining up edges |
| Level (iOS 17 and later) | A broken line in the center that turns yellow and joins when the phone is level | Straight horizons and level shots |
| Top-down crosshair | Two crosses that align when you point straight down or up | Flat-lay photos of food, documents, or products |
On older iOS versions, the crosshair for top-down shots appears only when Grid is on.
How to Use the Grid for Better Photos
- Rule of thirds: place your subject where the lines cross instead of dead center. Put a person’s eyes on the upper line.
- Horizons: put the horizon on the top line to emphasize the foreground, or the bottom line to emphasize the sky. Avoid splitting the photo in half.
- Straight lines: line up building edges, doorframes, and poles with the vertical lines to avoid tilted shots.
- Symmetry: when you do want a centered shot, use the middle box to keep it balanced.
- Leading lines: start roads, rails, or fences at a corner of the frame and let them lead toward an intersection point.
Other Camera Settings Worth Knowing
- Preserve Settings: keeps your last mode, filter, and controls instead of resetting each time.
- Mirror Front Camera: saves selfies the way you see them in the preview.
- View Outside the Frame: shows what’s just outside the shot on multi-lens iPhones, which helps with framing.
- Straighten later: in Photos, tap Edit > Crop and use the straighten dial if a shot is slightly tilted.
Troubleshooting
The grid doesn’t appear in the Camera app
Close the Camera app completely (swipe it away in the App Switcher) and reopen it. Make sure you turned on Grid in Apple’s Settings, not in a third-party camera app.
The grid shows in some apps but not others
The setting only applies to Apple’s Camera app. Instagram, Snapchat, and other camera apps have their own grid options, or none.
Lines appear in my saved photos
The built-in grid never saves into photos. Lines in the picture itself point to a dirty or damaged lens or a screen protector on the camera. Clean the lens gently with a soft cloth.
Frequently Asked Questions
Does the grid show up in photos?
No. It’s only a guide on the screen.
Can I change the grid to a different pattern?
No. The built-in grid is always 3 x 3. Some third-party camera apps offer other patterns, such as the golden ratio.
Does the grid work for video?
Yes. It appears in Video, Cinematic, Slo-mo, and Time-lapse modes too.
Summary
- Go to Settings > Camera.
- Turn on Grid (and Level) under Composition.
- Place subjects on the grid intersections and keep horizons on a line.
- Turn Grid and Level off to remove the lines.

Kermit Matthews is a freelance writer based in Philadelphia, Pennsylvania with more than a decade of experience writing technology guides. He has a Bachelor’s and Master’s degree in Computer Science and has spent much of his professional career in IT management.
He specializes in writing content about iPhones, Android devices, Microsoft Office, and many other popular applications and devices.