To PXE boot a Windows 10 PC, connect it to your network with an Ethernet cable, turn on Network Stack or PXE boot support in the BIOS/UEFI settings, then restart and press the boot menu key (often F12) and choose the entry that starts with UEFI: IPv4 and your network adapter’s name. PXE booting only works if there’s a PXE server on the network, such as Windows Deployment Services, FOG, Serva, or iVentoy, that sends the PC something to boot.
This guide covers both sides: setting up the PC you want to boot, and the server options for installing Windows over the network.
How PXE boot works
PXE (Preboot Execution Environment) lets a PC start from a file on another computer on the network instead of its own drive or a USB stick. When the PC starts, its network card asks the network for a boot server. A DHCP server gives it an IP address and points it to a TFTP or HTTP server, which sends a small boot program. That program then loads Windows Setup, a recovery tool, or a disk image.
IT departments use PXE to install Windows on many computers at once. At home, it’s useful for PCs without USB boot support or for installing Windows on several machines.
What you need
- The client PC (the one you want to boot), connected with an Ethernet cable. Most PCs can’t PXE boot over Wi-Fi.
- A PXE server on the same network, set up with Windows installation files or another boot image.
- A DHCP server that works with PXE. Your router provides DHCP, and most PXE tools can work alongside it (called proxy DHCP).
Step 1: Enable PXE boot in the BIOS/UEFI
- Restart the PC and press the BIOS/UEFI setup key, often F2, F10, Delete, or F1.
- Look for a setting like Network Stack, PXE Boot, Network Boot, IPv4 PXE Support, or Onboard LAN Boot ROM. It’s usually under Advanced, Boot, or Integrated Peripherals.
- Set it to Enabled. Enable IPv4 PXE Support if it’s a separate option.
- Save your changes and exit, usually with F10.
On Dell PCs, this is often under Connection > Integrated NIC > Enabled with PXE. On HP business PCs, look under Advanced > Boot Options > Network (PXE) Boot. On Lenovo, check Startup > Network Boot.
Step 2: Boot from the network
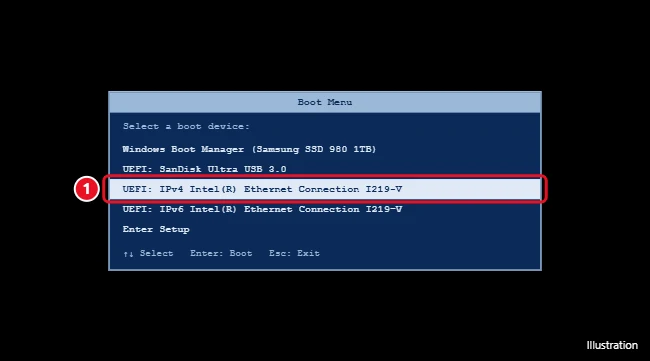
- Restart the PC and press the one-time boot menu key: F12 (Dell, Lenovo, Gigabyte, Acer), F9 (HP), F8 (ASUS desktops), or F11 (MSI, ASRock).
- Choose UEFI: IPv4 followed by your network adapter’s name. Use IPv6 only if your network and PXE server use it.
- Watch for a message like Start PXE over IPv4. The PC gets an IP address and downloads the boot file.
- If prompted to “Press F12 for network service boot” or “Press Enter to boot,” press the key right away.
Some PCs also let you start a network boot from Windows: hold Shift while clicking Restart, then choose Use a device > Network, if your PC lists it.
Step 3: Set up a PXE server
Pick an option based on where you are:
| Option | Best for | Notes |
|---|---|---|
| Windows Deployment Services (WDS) | Businesses with Windows Server | A Windows Server role. Often paired with Microsoft Configuration Manager. Microsoft has been moving away from some WDS workflows, so check its current guidance for Windows 11. |
| FOG Project | Schools and IT teams | Free and open source. Captures and deploys disk images to many PCs. |
| iVentoy | Home users and small labs | Boots ISO files over the network with little setup. Free for personal use. |
| Serva | Home users and technicians | Windows app that serves Windows installers over PXE. |
The general setup with a home-friendly tool looks like this:
- Install the PXE tool on a Windows PC or server that’s connected by Ethernet to the same network.
- Download the official Windows 10 or Windows 11 ISO from Microsoft and add it to the tool’s image folder.
- Set the tool to use proxy DHCP so it works alongside your router.
- Allow the tool through Windows Firewall when asked (it uses DHCP, TFTP, and sometimes HTTP ports).
- Start the server, then PXE boot the client PC as described above.
PXE boot not working? Common fixes
- “PXE-E61: Media test failure, check cable”: The Ethernet cable isn’t connected, or the port has no link. Check the cable and the network switch.
- “PXE-E53: No boot filename received” or “No offer received”: The PC can’t find a PXE server. Make sure the server is running, on the same network, and not blocked by a firewall.
- Network option missing from the boot menu: Enable Network Stack or PXE in the BIOS, and save before restarting.
- Boots, then stops with a Secure Boot error: The boot file isn’t signed. Use a signed boot loader, or temporarily turn off Secure Boot.
- Mixing UEFI and Legacy: Your server must offer the right boot file for UEFI PCs (for example, a .efi file). Legacy BIOS PCs need a different one.
- USB Ethernet adapters: Only some adapters support PXE, and the BIOS may need a USB Network Boot option turned on.
Frequently asked questions
Can I PXE boot over Wi-Fi?
Generally no. PXE runs before Windows loads, when Wi-Fi drivers aren’t available. Use a wired connection.
Is PXE boot safe?
On a trusted network, yes. On shared networks, disable PXE boot in the BIOS when you’re not using it so the PC can’t be booted from an unknown server.
How do I turn off PXE boot?
In the BIOS, disable Network Stack or PXE Boot, or move the network option below your main drive in the boot order. This also stops the “Start PXE over IPv4” message at startup.
Does this work on Windows 11 PCs?
Yes. PXE is handled by the PC’s firmware, so the client steps are the same for Windows 10 and Windows 11 computers.

Kermit Matthews is a freelance writer based in Philadelphia, Pennsylvania with more than a decade of experience writing technology guides. He has a Bachelor’s and Master’s degree in Computer Science and has spent much of his professional career in IT management.
He specializes in writing content about iPhones, Android devices, Microsoft Office, and many other popular applications and devices.