To uninstall and reinstall audio drivers in Windows 11, right-click Start and open Device Manager, expand Sound, video and game controllers, right-click your audio device (such as Realtek(R) Audio), and choose Uninstall device. Check Attempt to remove the driver for this device for a clean reinstall, click Uninstall, and restart your PC. Windows reinstalls a working audio driver automatically when it starts. For the best driver, download the latest one from your PC or motherboard maker afterward.
Before you start
- Try the easy fixes first: check the volume and output device in Settings > System > Sound, and run the audio troubleshooter from Get Help.
- Note your audio device’s name and your PC model, so you can find the right driver later.
- Create a restore point if you’re worried about losing sound completely.
Step 1: Uninstall the audio driver
- Right-click Start and choose Device Manager.
- Expand Sound, video and game controllers.
- Right-click your audio device, like Realtek(R) Audio, Intel(R) Smart Sound Technology, or Conexant, and choose Uninstall device.
- Check Attempt to remove the driver for this device, then click Uninstall.
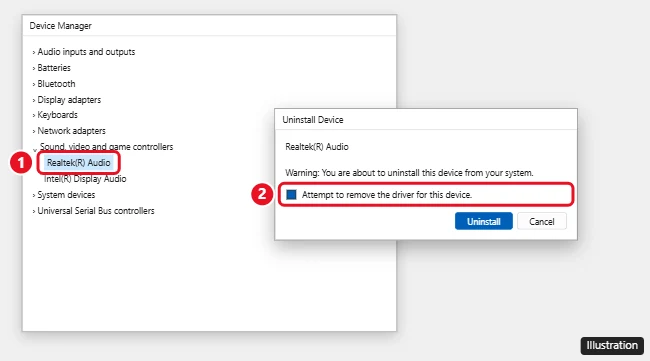
Leave the checkbox unchecked if you just want Windows to reload the same driver.
Step 2: Reinstall the audio driver
Option A: Let Windows reinstall it
- Restart your PC.
- Windows detects the audio hardware and installs a driver automatically.
- If it doesn’t, open Device Manager, click Action > Scan for hardware changes.
Option B: Install the driver from your PC maker (recommended)
- Go to your PC or motherboard maker’s support site, like Dell, HP, Lenovo, ASUS, Acer, or MSI.
- Enter your model or serial number and download the latest audio driver for Windows 11.
- Run the installer and restart when it’s done.
Maker drivers often include audio enhancements and control panels that Windows’ generic driver doesn’t have.
Option C: Windows Update optional drivers
Go to Settings > Windows Update > Advanced options > Optional updates > Driver updates, check any audio driver listed, and click Download & install.
Roll back an audio driver after a bad update
- In Device Manager, right-click your audio device and choose Properties.
- Open the Driver tab and click Roll Back Driver.
- Choose a reason and click Yes.
If Roll Back Driver is grayed out, no older driver is saved. Use Option B to install a known-good version.
Still no sound?
- Check Audio inputs and outputs in Device Manager for disabled devices, and right-click to enable them.
- In Settings > System > Sound, make sure the right output is selected and not muted.
- Restart the Windows Audio service: open Services, right-click Windows Audio, and choose Restart.
- See more audio troubleshooting steps.
Frequently asked questions
Will uninstalling the audio driver delete anything?
No personal files are affected. You might lose custom audio settings, like equalizer presets, which you can set up again.
What’s the difference between resetting and reinstalling an audio driver?
They’re usually the same thing: uninstalling the device and letting Windows load the driver again.
Is this the same on Windows 10?
Yes. Device Manager works the same way on Windows 10.

Kermit Matthews is a freelance writer based in Philadelphia, Pennsylvania with more than a decade of experience writing technology guides. He has a Bachelor’s and Master’s degree in Computer Science and has spent much of his professional career in IT management.
He specializes in writing content about iPhones, Android devices, Microsoft Office, and many other popular applications and devices.