To open the BIOS in Windows 11, go to Settings > System > Recovery and click Restart now next to Advanced startup. When the blue screen appears, choose Troubleshoot > Advanced options > UEFI Firmware Settings > Restart. Your PC restarts into its BIOS (UEFI) settings. You can also tap your PC’s BIOS key, usually F2, F10, F1, or Delete, as soon as you turn it on.
This guide covers every way to get in, including a one-line command, the BIOS key for popular brands, and what to do if nothing works.
Method 1: Open BIOS from Windows 11 Settings
- Save your work.
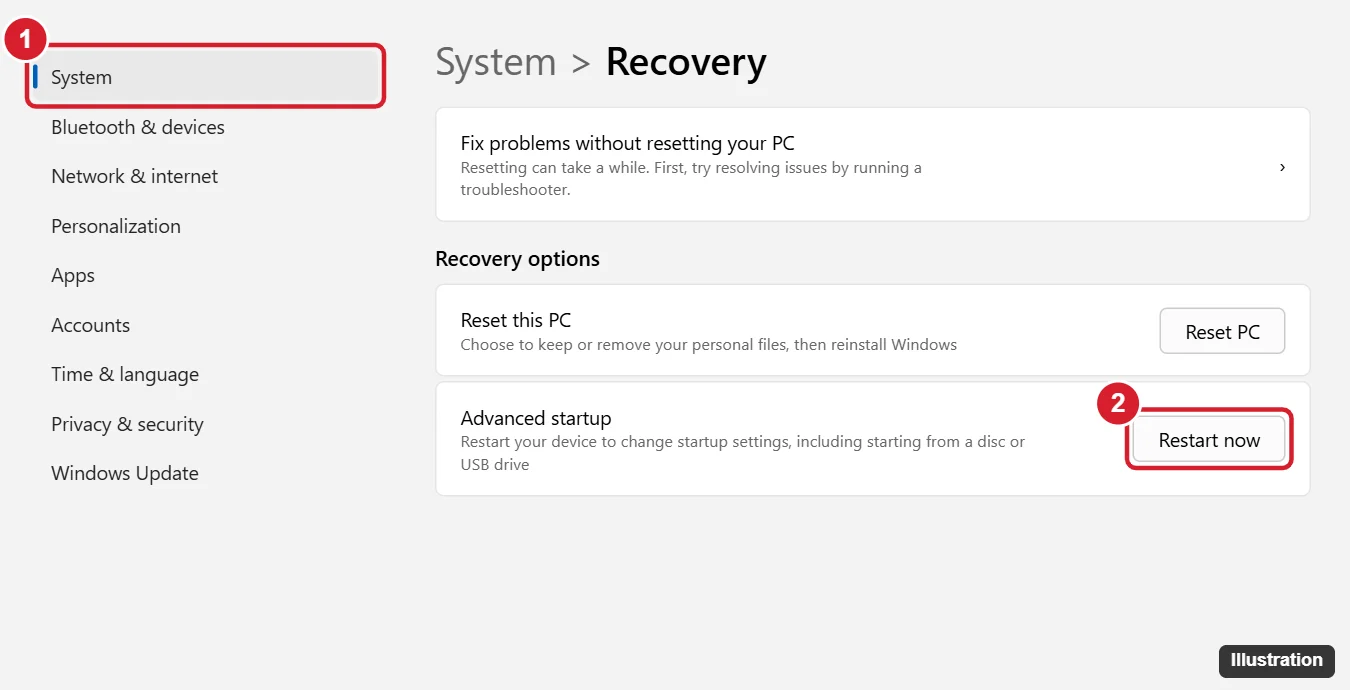
- Press Windows + I, then go to System > Recovery.
- Next to Advanced startup, click Restart now, then Restart now again to confirm.
- On Choose an option, click Troubleshoot > Advanced options.
- Click UEFI Firmware Settings, then Restart.

Method 2: Shift + Restart
Click Start > Power, hold Shift, and click Restart. This works from the sign-in screen too. Then follow steps 4 and 5 above.
Method 3: Use a command
- Right-click Start and choose Terminal (Admin).
- Type shutdown /r /fw /t 0 and press Enter.
Your PC restarts directly into the firmware settings, skipping the blue menu. It only works on UEFI PCs.
Method 4: Press the BIOS key at startup
- Hold Shift and click Shut down to fully turn off the PC (this bypasses Fast Startup).
- Press the power button and immediately tap the BIOS key over and over until the setup screen opens.
| PC brand | Common BIOS key |
|---|---|
| Dell | F2 (F12 for the boot menu) |
| HP | Esc, then F10 (or F10 directly) |
| Lenovo | F2 or Fn + F2 on IdeaPad; F1 on ThinkPad and ThinkCentre; some models have a small Novo button |
| ASUS | F2 on laptops; Delete on desktop motherboards |
| Acer | F2 or Delete |
| MSI, Gigabyte, ASRock (desktops) | Delete |
| Microsoft Surface | Hold Volume Up, then press and release the power button |
Keys vary by model, so check your PC maker’s support site if these don’t work.
Common things to change in the BIOS
| Setting | Why you’d change it | Usually found under |
|---|---|---|
| Boot order / Boot priority | Start from a USB drive to install or repair Windows | Boot |
| TPM (Intel PTT / AMD fTPM) | Windows 11 requirements, BitLocker | Security or Advanced |
| Secure Boot | Windows 11 requirements, some games’ anti-cheat | Boot or Security |
| Virtualization (Intel VT-x / AMD SVM) | Virtual machines, WSL 2, Android emulators | Advanced or CPU Configuration |
| XMP / EXPO memory profile | Run RAM at its rated speed on desktops | Overclocking or AI Tweaker |
| Date and time | Fix a clock that resets after a dead CMOS battery | Main |
Step-by-step guides: enable TPM 2.0, enable virtualization, and turn on Secure Boot. ASUS owners can also see opening the BIOS on an ASUS PC.
If something goes wrong after a change
- Go back into the BIOS and choose Load Optimized Defaults or Load Setup Defaults (often F9), then save and exit.
- If the PC won’t start at all, let it try two or three times; many boards restore defaults automatically after failed boots.
- A BitLocker recovery screen after a change is normal. Enter the key from account.microsoft.com/devices/recoverykey.
- Don’t set a BIOS supervisor password unless you’ll store it safely; forgetting it can lock you out of firmware settings for good.
If you can’t open the BIOS
- No UEFI Firmware Settings option: Your PC may use legacy BIOS mode. Check BIOS Mode in System Information (press Windows + R and type msinfo32). Use the BIOS key instead.
- Windows starts before you can press the key: Turn off Fast Startup in Control Panel > Power Options > Choose what the power buttons do, or use Method 1 or 3.
- The keyboard doesn’t respond: Use a wired USB keyboard in a USB port directly on the PC.
- BIOS asks for a password: On work or school PCs, contact your IT department. On a personal PC, contact the manufacturer’s support.
Why you might need the BIOS in Windows 11
- Turning on TPM (also called PTT or fTPM) or Secure Boot, which Windows 11 requires.
- Changing the boot order to start from a USB drive.
- Enabling virtualization (Intel VT-x or AMD SVM) for virtual machines and some Android and Linux features.
- Checking hardware details or updating firmware.
Only change settings you understand. If something goes wrong, use Load Defaults (often F9), then Save & Exit (often F10).
Related: Enable Wi-Fi in BIOS on Windows 11.
Frequently asked questions
Is it safe to open the BIOS?
Yes. Opening it doesn’t change anything. Just avoid changing settings you’re unsure about.
How do I leave the BIOS without saving?
Choose Exit > Discard Changes and Exit, or press Esc and confirm. The exact wording depends on your PC.
What about Windows 10?
The steps are almost the same. See how to boot into BIOS on Windows 10.

Kermit Matthews is a freelance writer based in Philadelphia, Pennsylvania with more than a decade of experience writing technology guides. He has a Bachelor’s and Master’s degree in Computer Science and has spent much of his professional career in IT management.
He specializes in writing content about iPhones, Android devices, Microsoft Office, and many other popular applications and devices.