A brand-new SSD doesn’t appear in File Explorer when you first install it, whether it’s an internal M.2 NVMe drive, a 2.5-inch SATA SSD, or an external SSD. Windows 11 needs you to initialize the drive, create a partition, and format it before you can use it. People often call this “activating” the SSD. This guide covers doing it in Disk Management or the Windows 11 Settings app, choosing GPT vs. MBR and NTFS vs. exFAT, and what to do if the SSD doesn’t show up at all.
Quick Answer
Right-click Start and open Disk Management. When the Initialize Disk window appears, choose GPT and click OK. Then right-click the new disk’s Unallocated space, choose New Simple Volume, and finish the wizard with NTFS and a drive letter. The SSD now appears in File Explorer.
Before You Start
- Only do this on a new or empty drive. Initializing and formatting erase any data on it.
- Moving Windows to the SSD instead? If you want the new SSD to replace your current system drive, clone or reinstall Windows instead of formatting it as a second drive.
- Make sure the SSD is installed correctly: M.2 drives seated and screwed down, SATA drives connected with both data and power cables.
Method 1: Disk Management
Step 1: Initialize the disk
- Right-click Start and choose Disk Management.
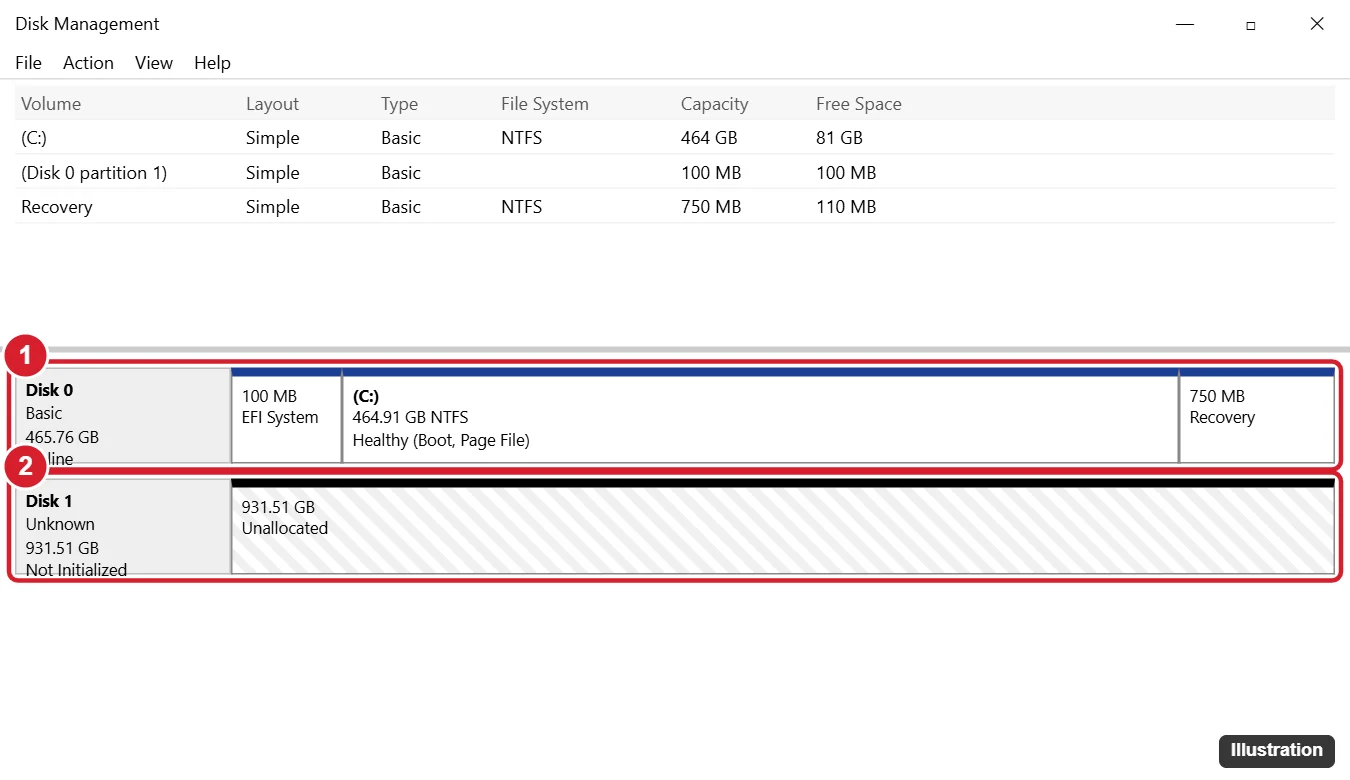
- The Initialize Disk window usually opens automatically. If it doesn’t, right-click the new disk’s label on the left (for example, Disk 1, Not Initialized) and choose Initialize Disk.
- Select the new disk, choose GPT (GUID Partition Table), and click OK.
Step 2: Create and format a volume
- Right-click the Unallocated space on the new disk and choose New Simple Volume.
- Click Next and keep the maximum size to use the whole SSD, or enter a smaller size to create several partitions.
- Assign a drive letter.
- Choose NTFS, leave Allocation unit size at Default, type a Volume label (such as “Games SSD”), and keep Perform a quick format checked.
- Click Next, then Finish.
Method 2: Windows 11 Settings App
- Open Settings > System > Storage.
- Click Advanced storage settings > Disks & volumes.
- Find the new disk and click Initialize. Choose GPT.
- Select the unallocated space, click Create volume, and enter a label, drive letter, and file system.
- Click Format.
GPT or MBR? NTFS or exFAT?
| Choice | Pick this when |
|---|---|
| GPT | Almost always. Required for drives over 2 TB and standard on modern UEFI PCs. |
| MBR | Only for very old PCs or devices that require it |
| NTFS | Internal SSDs used only with Windows. Supports large files, permissions, and compression. |
| exFAT | External SSDs shared between Windows and Mac |
| FAT32 | Only for small drives used with old devices. It has a 4 GB file size limit. |
If the New SSD Doesn’t Appear
Not listed in Disk Management at all
- Check the BIOS/UEFI: restart and enter setup (often F2 or Del). See whether the SSD is detected under Storage or NVMe settings. If it isn’t, reseat the drive or try another M.2 slot or SATA port.
- M.2 slot sharing: some motherboards disable certain SATA ports or M.2 slots when others are used. Check the motherboard manual.
- SATA vs. NVMe: make sure the M.2 slot supports your drive type.
- Intel VMD/RST: some laptops need the Intel Rapid Storage Technology driver.
- External SSDs: try another cable or USB port, preferably directly on the PC rather than through a hub.
Listed but shows “Offline”
Right-click the disk label and choose Online.
Shows “Unknown, Not Initialized” and initializing fails
Try DiskPart: open an admin Command Prompt and run diskpart, list disk, select disk N, clean, and convert gpt. Then create the volume in Disk Management. Double-check the disk number before running clean.
Capacity is smaller than advertised
Windows shows sizes in binary units, so a 1 TB drive shows as about 931 GB. That’s normal.
After Setup: Optional Tweaks
- Install the SSD maker’s utility for firmware updates and health monitoring.
- Move games or large folders to the new drive, or change where new apps save in Settings > System > Storage > Advanced storage settings > Where new content is saved.
- TRIM is enabled automatically in Windows 11. Optimize Drives handles SSD maintenance, so no defragmenting is needed.
Frequently Asked Questions
Do I need to “activate” an SSD with a key or software?
No. Activation just means initializing and formatting it in Windows.
Can I install Windows on the new SSD instead?
Yes. Leave it unallocated and install Windows from a USB drive, or clone your current drive.
Is this the same on Windows 10?
Yes, in Disk Management. The Settings app method is specific to Windows 11.
Summary
- Open Disk Management and initialize the SSD as GPT.
- Right-click the unallocated space and choose New Simple Volume.
- Format it as NTFS (or exFAT for external drives) with a drive letter.
- If it isn’t detected, check the BIOS, the connection, and the storage drivers.

Kermit Matthews is a freelance writer based in Philadelphia, Pennsylvania with more than a decade of experience writing technology guides. He has a Bachelor’s and Master’s degree in Computer Science and has spent much of his professional career in IT management.
He specializes in writing content about iPhones, Android devices, Microsoft Office, and many other popular applications and devices.