Many applications that you use to type today will have some sort of tool that helps you to spell correctly. Whether it’s a spell checker that assists you when typing on a small keyboard, such as the one found on an iPhone or Android smartphone, or a more comprehensive tool in a desktop application, it’s never been easier to get spelling and grammar assistance when you type.
Microsoft Word 2013 has a number of proofreading tools that you can use when creating and editing documents. Some of them, like the passive voice checker, require you to execute them manually while others, like the automatic spell checker, happen by default.
However, you might find that you need to turn off the spell check in Word 2013 if is disrupting your work, or if you need to remove the red underlining that is displayed when an incorrectly-spelled word is entered into your document. Our guide below will show you how to stop the automatic spell check in Word 2013 so that any spell checking that occurs is due to a manual check that you initiate.
How to Stop Spellcheck in Word 2013
- Open a Word document.
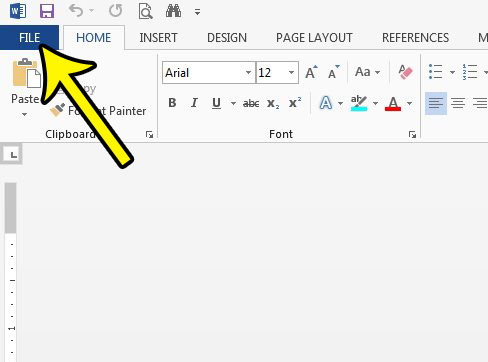
- Click the File tab.
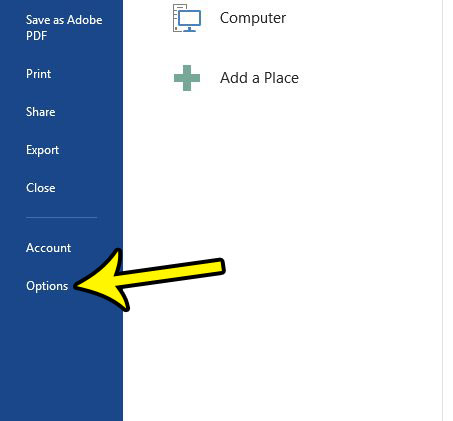
- Click the Options button.
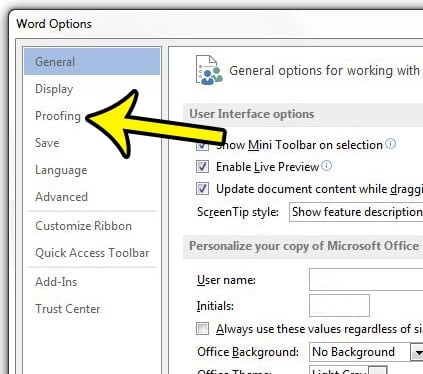
- Choose the Proofing tab.
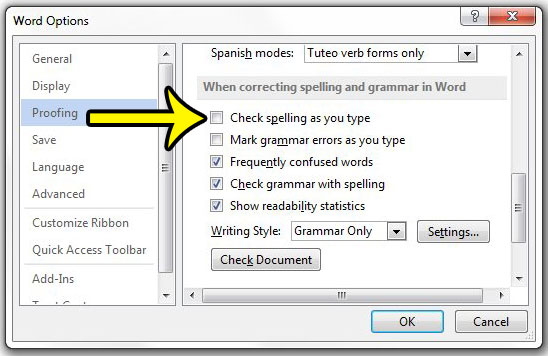
- Uncheck the Check spelling as you type box.
- Click OK.
Our tutorial continues below with more information on turning off spell check in Word 2013, including pictures of these steps.
How to Disable the Automatic Spell Check in Word 2013 (Guide with Pictures)
The steps below are going to turn off the setting in Word 2013 where the program will automatically check your spelling as you type. This means the red underlining that occurs as you are typing in your document and enter a misspelled word. There is also a separate setting for the automatic grammar checker, which we will also identify in these steps.
Step 1: Open Word 2013, then click the File tab at the top-left corner of the window.

Step 2: Click the Options button at the bottom of the column on the left side of the window.

Step 3: Click the Proofing tab in the left column of the Word Options window.

Step 4: Scroll down to the When correcting spelling and grammar in Word section of the menu, then click the box to the left of Check spelling as you type to remove the check mark.
Note that you can also remove the check mark from the Mark grammar errors as you type option if you would like to stop that as well.

Step 5: Click the OK button at the bottom of the window to save and apply your changes.
Our guide continues below with additional information about using or turning off the Word spell checker.
If I Turn Off the Microsoft Word Spellchecker Will it Stop Underlining a Misspelled Word?
Yes, then steps above are going to stop Microsoft Word from checking spelling as you type, which includes the red underline that it places under words that are spelled incorrectly.
This guide is meant to assist you if you don’t want Word to actively check your typing for spelling and grammar errors, and you would instead prefer to initiate the proofreading tools at a later time when you are ready to look for and deal with any spelling errors that you might have made during the course of document creation.
More Information on How to Turn Off Spell Check in Word 2013
When you complete the steps above you will have turned off the spell checker tool for the Microsoft Word application. This means that future new documents that you create, as well as old documents that you open, won’t have their spelling checked as you are typing in the document.
You will still be able to use spell checker in other Microsoft Office applications, such as Microsoft Excel and Microsoft Powerpoint. You will also still be able to manually activate the spell checker tool from the Review tab. This guide simply shows you how to turn off the automatic spell checker feature that adds underlines of various colors to your words as the application detects a spelling or grammar mistake.
Word automatically checks for a lot of things while you are typing by default. This combination of grammar checking and looking for correct spelling can be overridden if you follow the steps in our guide above and disable the grammar check box and spelling check box that control the active proofreading actions. If you find that you are using the correct word, and that it is spelled correctly, but Word is still flagging it, then it could be an uncommon word, or one that is part of field that isn’t covered well in Microsoft Word’s dictionary.
You can customize many aspects of the Word proofreading experience through the Word Options window that we navigated to in the guide above. If you click the AutoCorrect Options button or the Custom Dictionaries button you can change certain elements of the spelling and grammar checks to better suit the way that you utilize Microsoft Word.
The spell check is useful when you have a word that the program can identify as a misspelling, but it can be an issue if you have entered the wrong word, but spelled it properly. One way to aid with this is the find and replace tool in Word 2013. That allows you to search for specific words and replace them with different ones.
Additional Reading

Kermit Matthews is a freelance writer based in Philadelphia, Pennsylvania with more than a decade of experience writing technology guides. He has a Bachelor’s and Master’s degree in Computer Science and has spent much of his professional career in IT management.
He specializes in writing content about iPhones, Android devices, Microsoft Office, and many other popular applications and devices.