Have you ever needed to include a boss or colleague on an email that you are sending, but you don’t want the other people in the conversation to know that person has been included? You may have resorted to options like forwarding the email after sending it to the other people in the conversation, but there is another option, called “blind carbon copy” or BCC, that can be more efficient.
The BCC field is an important part of the email environment. It allows you to copy additional people on the messages you send, but it removes them from any future Reply Alls, and the other recipients of the email message won’t be able to see that the BCC’d individual has received a copy of the message.
You can BCC someone in Outlook 2013, although the field to do so is not visible by default. Our guide below will teach you how to show the BCC field in Outlook 2013 so that you can add email addresses to that field and start blind copying contacts on your email messages.
How to Show the BCC Field in Outlook 2013
- Open Outlook 2013.
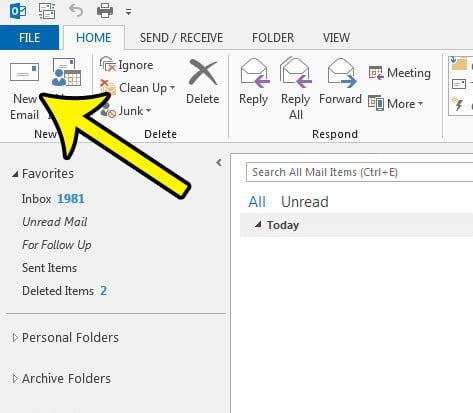
- Click New Email.
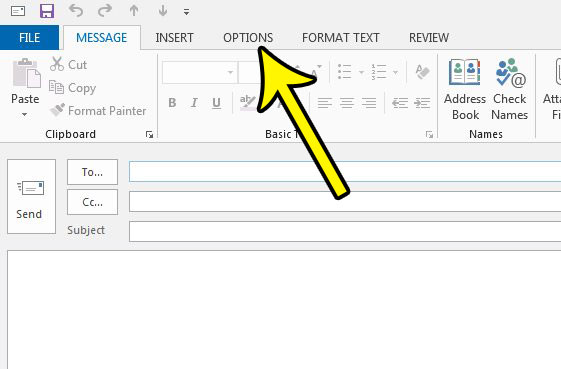
- Select Options.
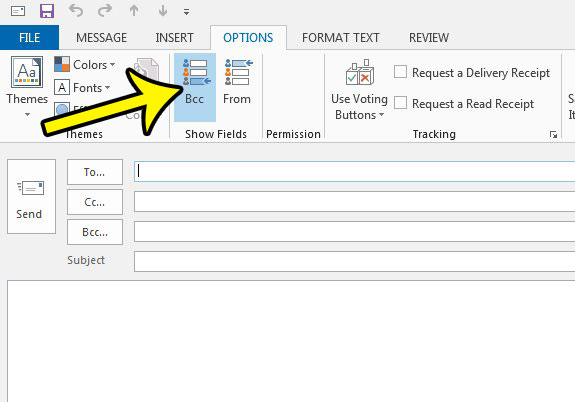
- Click the BCC button.
Our article continues below with additional information on adding the BCC field in Outlook 2013, including pictures of these steps.
How to Enable the BCC in Outlook 2013 for Sending Emails
The steps in this article are going to change a setting in Outlook 2013 so that the BCC field is included as an option at the top of the Message window. This setting can be toggled on or off at any time by following these same steps.
Step 1: Open Outlook 2013.
Step 2: Click the New Email button at the top-left corner of the window.

Step 3: Click the Options tab at the top of the message window.

Step 4: Click the Bcc button in the Show Fields section of the ribbon.
The BCC field should be visible immediately after clicking that button, as it is in the image below.

Now you should be able to type an email address into that BCC field and the other recipients of the email message will not be able to see that the email was sent to anyone whose address was in that blind carbon copy field.
Can I Remove Blind Carbon Copy or BCC Recipients in Outlook?
Managing the BCC recipients on an email that you are sending is the same as managing any other mail address that you have added to the “To” field or the CC field in a new message in Microsoft Outlook.
If you click inside the field that contains the email address that you want to remove you can simply press the backspace key on your keyboard to delete any unwanted address that you have already typed into one of your messages.
More Information on How to Add BCC to Outlook 2013
This setting will persist after you send your email. That means that the BCC field will be displayed as an option for the next email you send, and every email after that unless you elect to return to that screen in Step 4 and click the Bcc button again to make it disappear.
The Show Fields group on the Options tab contains not only the BCC field, but the From field. If you have more than one email address in Outlook then using the From field can be a nice way to ensure that you are sending the email from the correct address.
If you need to format the content in your message after you chose to show BCC field then you can click the Message tab at the top of the window, which is the default tab that you see whenever you send an email.
While the steps in this article are focused specifically on how to show BCC in Outlook 2013 you can use these same steps in other versions of Microsoft Outlook such as Outlook 2010 or Outlook 2016.
One other item in the Outlook display that you might want to be able to view or hide is the Reading pane. This is where you can see the contents of the selected message. You can find this option by selecting the View tab at the top of the Outlook window, then clicking the Reading Pane option and selecting where you want it displayed.
Is Outlook 2013 not checking for new email messages often enough? or is it checking too frequently, causing your email provider to give you warnings about the frequency of the checks? Learn how to configure the send and receive settings in Outlook 2013 so that you can use settings that are better suited to your requirements.
Additional Information

Kermit Matthews is a freelance writer based in Philadelphia, Pennsylvania with more than a decade of experience writing technology guides. He has a Bachelor’s and Master’s degree in Computer Science and has spent much of his professional career in IT management.
He specializes in writing content about iPhones, Android devices, Microsoft Office, and many other popular applications and devices.