It can be a lot of work to get your Excel spreadsheet finalized, and the data looking good, in a presentable format. You may have even already changed some print settings in anticipation of the worksheet not printing right.
But when you go to print that spreadsheet and not all of it is there, then you might be wondering why is Excel cutting off text when printing.
How to Fix Only Part of My Spreadsheet Printing in Excel 2013
- Open your spreadsheet.
- Click Page Layout.
- Select Print Area.
- Choose Clear Print Area.
Our article continues below with additional information on removing a print area in Microsoft Excel, including pictures for these steps.
Have you been working on a spreadsheet, editing and adding data, only to print it and find that it isn’t including all of your data?
This can be a confusing issue to encounter, as it is typically caused by a setting that was applied to that spreadsheet by someone else that was working on it.
Fortunately, you can fix Excel cutting off text when printing by changing a specific setting.
The reason that only part of your spreadsheet is printing in Excel 2013 is due to something called a Print Area. This is a setting for a spreadsheet where you can choose to only print part of the data that is included in the sheet. But if this setting is preventing you from printing a sheet correctly after a bit of editing, then our guide below will show you how to clear that Print Area and print the entire sheet instead.
How to Clear a Print Area in Excel 2013 (Guide with Pictures)
The steps in this article assume that you have a large spreadsheet with cells that contain data, but some of those cells aren’t printing. This is more common with spreadsheets that you receive from other people. Setting a print area is a helpful way to ensure that only specific information prints but if you edit a spreadsheet with a set print area, you can experience some odd results. Following the steps below to clear that print area will typically resolve issues where only part of a spreadsheet is printing.
Step 1: Open your spreadsheet in Excel 2013.
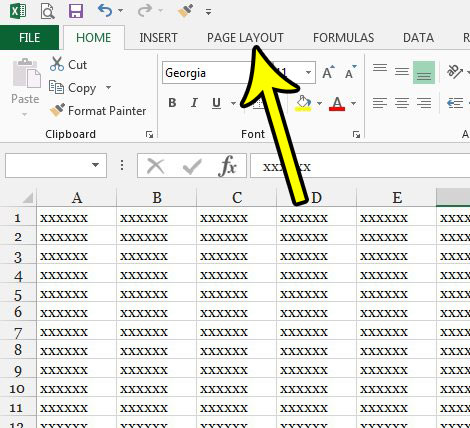
Step 2: Click the Page Layout tab at the top of the window.

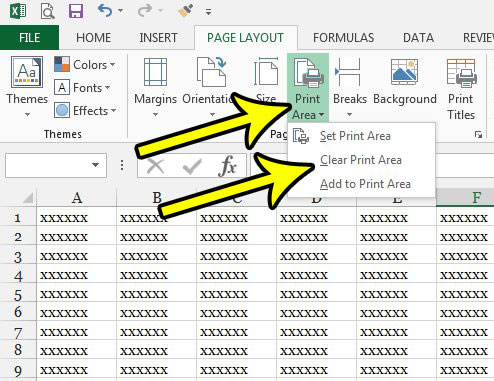
Step 3: Click the Print Area button in the Page Setup section of the ribbon, then click the Clear Print Area option.

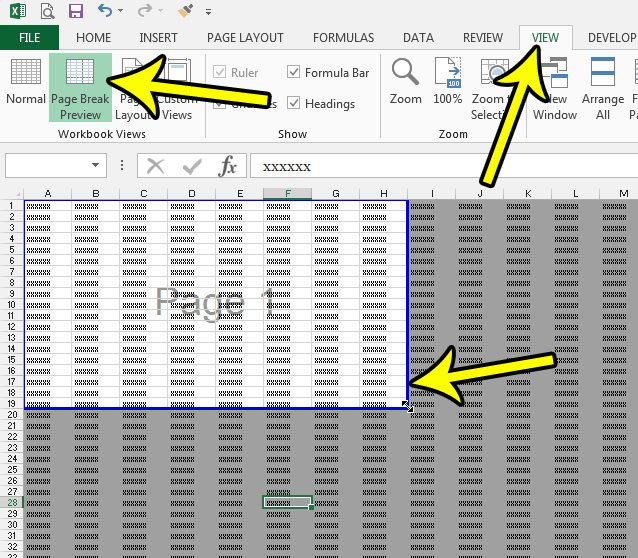
Note that you can also choose to adjust the print area by clicking the View tab at the top of the window, selecting the Page Break Preview option, then dragging the blue box borders to include all of the spreadsheet.

Now that you know how to fix Excel cutting off text when printing by using one of our two methods for adjusting the print area, you will be able to resolve that issue should it happen again in the future.
You can use the print area to your advantage, however, too. If you are the creator and editor of the spreadsheet, it’s a lot easier to remember what you’ve done. That means you can set your own print areas and not be confused when Excel starts printing only some of the spreadsheet.
You can also use print areas when you want to print an empty spreadsheet. Excel won’t print cells that don’t contain data. But if you have defined a print area you can print the cells from that print area even if they’re empty.
If you are experiencing other issues printing in Excel, then there are many things that you might be able to do which can resolve those issues. Check our Excel printing guide for some tips and settings that can make Excel printing a little easier.
If the text being cut off in Excel isn’t caused by the print area, then it can be a little tougher to pinpoint the problem. If text is being cut off inside cells, then the problem may be with the text wrap setting. You can turn text wrapping on or off by selecting the Home tab, then clicking the Wrap Text button in the Alignment section of the ribbon.

Kermit Matthews is a freelance writer based in Philadelphia, Pennsylvania with more than a decade of experience writing technology guides. He has a Bachelor’s and Master’s degree in Computer Science and has spent much of his professional career in IT management.
He specializes in writing content about iPhones, Android devices, Microsoft Office, and many other popular applications and devices.