Do you have a company logo or a graph image on your computer that you want to include in your document?
Google Docs provides a variety of tools that you can use to customize your documents, including a handful of options that can help you add images to them.
Our tutorial below will walk you through the steps of uploading a picture to Google Docs so that you can insert it into a document.
How to Perform a Google Docs Picture Upload
When you are creating a document for work or school you may need to include an image. This could be a picture that you found online, but it might also be a picture that you have saved to your computer.
- Sign in to your Google Drive and open the document.
- Select the point in the document where you want the picture.
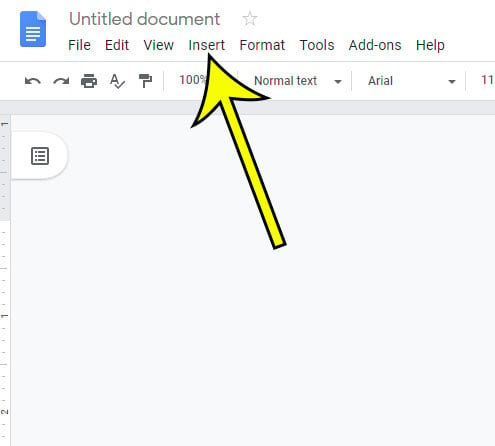
- Select the Insert tab at the top of the window.
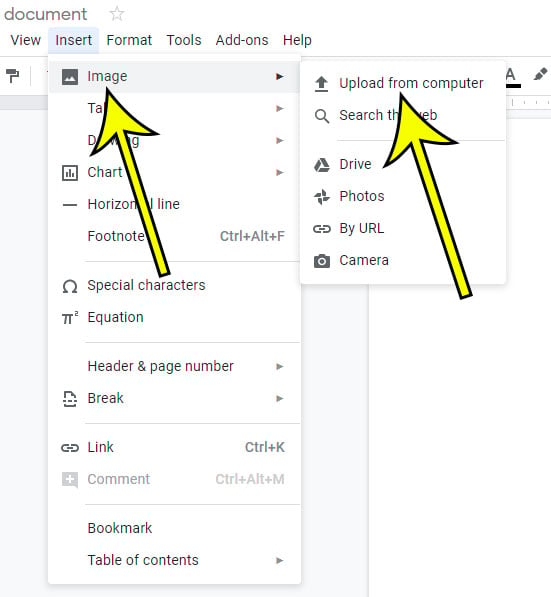
- Choose the Image option, then click Upload from computer.
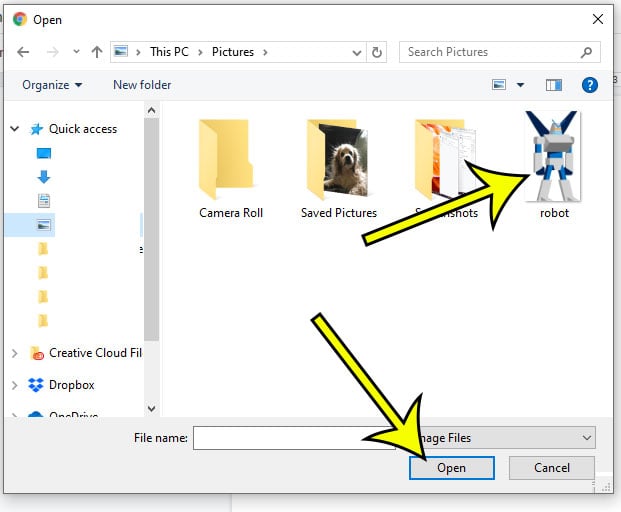
- Browse to the picture you wish to use, select it, then click the Open button.
Our guide continues below with additional information on uploading pictures from your computer so that you can use them in a Google document, including pictures of these steps.
Luckily Google Docs has a utility that allows you to insert photos from your computer into one of your documents, and it works similarly to other ways that you might have used pictures in various apps on the Internet.
The steps in this article are going to show you how to upload a picture from your computer to Google Docs and insert that picture into your document.
We cover the steps briefly at the beginning of the article, then we will continue below with more information and pictures for the steps.
You can upload a Google Docs picture by opening the document, clicking Insert, choosing Image, then Upload from computer. You can then select the picture and click Open.
Adding images to a document in Google Docs is something that you may need to do in a variety of situations. Much like adding a picture to a Microsoft Word document, this is something that you can accomplish if the picture is currently stored on your computer’s hard drive.
Our tutorial below is going to show you a method for uploading a picture from your computer to a document that is currently open in Google Docs.
Once the picture is added to the document you will be able to resize or adjust that picture to suit the needs of the document.
Powerpoint lets you add images too, and you can even edit them. if you would like to make a picture in a slideshow transparent, then find out more with our how to make picture background transparent in Powerpoint 2013 guide.
How to Add a Picture from your Computer to a Google Docs Document (Guide with Pictures)
The steps in this article were performed in the desktop version of the Google Chrome Web browser, but will also work in other desktop Web browsers like Mozilla Firefox or Microsoft Edge.
Step 1: Sign in to your Google Drive at https://drive.google.com and open your document.
Step 2: Choose the point in the document where you wish to add the image.
Step 3: Select the Insert tab from the menu.

Step 4: Hover over the Image option, then select the Upload from computer option.

Step 5: Browse to the picture that you are uploading, select it, then click the Open button.

The default Google Docs format for the picture that you have uploaded will be the actual size and orientation of the image.
In Step 4 above you will notice that there are a handful of other options for adding a picture to your document. These include:
- Upload from computer
- Search the web
- Drive
- Photos
- By URL
- Camera
In some cases, this may mean that the picture is much too large for what you need. You can adjust the size of the picture by clicking on it and then dragging one of the blue handles to resize the picture.
You can rotate the image by selecting it, then clicking the Crop image button in the toolbar at the top of the window.
You will then need to click on the blue circle at the top of the image and drag it until the picture is in the proper orientation.
Additional Notes on Working With Google Docs
- Once you are done with your document, you may need it in a different format, such as a PDF or a Microsoft Office Word document. You can convert your Google Docs file to these file types by selecting the File tab, then choosing Download and selecting the appropriate file type.
- If you are trying to upload files to Google Docs so that you can edit them, then you will need to return to the Google Drive homepage, click the New button, then select File upload from the drop-down menu. There is also a setting in Google Drive where you can have it automatically convert uploaded files so that they can be edited in the appropriate Google App. Click the gear icon at the top-right of the https://drive.google.com page, choose Settings, then check the box in the Convert uploads section.
- Uploading files to Google Drive is a great way to ensure that you have access to important information when you’re on the go. While uploading Excel, Word, or Powerpoint files and editing them in the Google Sheets, Google Docs, or Google Slides counterparts is useful, you can upload other files, such as audio or video, and simply use Google Drive for its cloud storage capabilities.
Curious about your options for converting from Google Docs? Find out about the available conversion types to see if the one that you need is available.

Kermit Matthews is a freelance writer based in Philadelphia, Pennsylvania with more than a decade of experience writing technology guides. He has a Bachelor’s and Master’s degree in Computer Science and has spent much of his professional career in IT management.
He specializes in writing content about iPhones, Android devices, Microsoft Office, and many other popular applications and devices.