Including a text box in a Word document provides you with the ability to display text outside of the regular document content. This text box can then be formatted and moved around, but you may be wondering how to remove the border from that text box if you don’t need it.
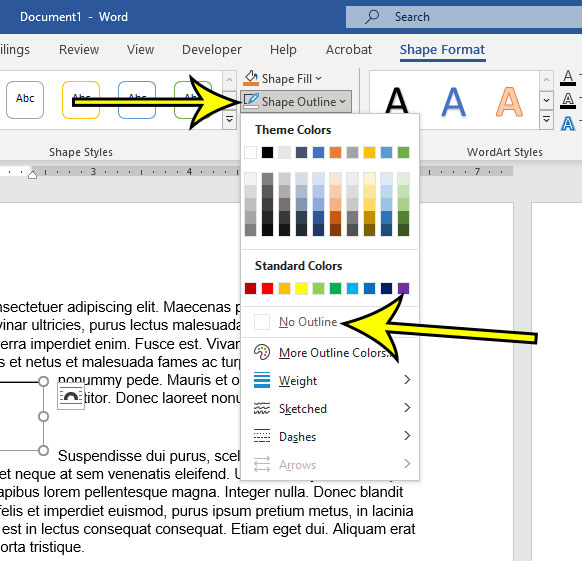
You can remove borders from text boxes in a Word document by selecting the border of the text box, choosing the Shape Format tab at the top of the window, then clicking the Shape Outline button and selecting the No Outline option from the drop down list.
Microsoft Word handles a text box like a separate object, much like if you added a picture or a table to your document. As such, it has a variety of formatting options that you can apply.
But if you have never had to change a setting for a text box, you may be having trouble figuring out where all of those options are.
Our guide below will show you how to get rid of your text box border in Microsoft Word so that you don’t see the line surrounding the box in your document.
How to Delete a Text Box Border in Microsoft Word
- Open your document.
- Click on the text box border.
- Select the Shape Format tab.
- Click the Shape Outline button and choose No Outline.
Our article continues below with additional information on how to remove text box border in Word, including pictures of these steps.
Learn how to draw a line through text in Google Docs if you also use that program and want to learn about some of its less common text formatting tools.
How to Get Rid of the Border on a Text Box in Word 2016 (Guide with Pictures)
The steps in this article were performed in the Microsoft Word for Office 365 version of the application, but will work in most other versions of Word as well.
Step 1: Open the document with the text box whose border you wish to remove.
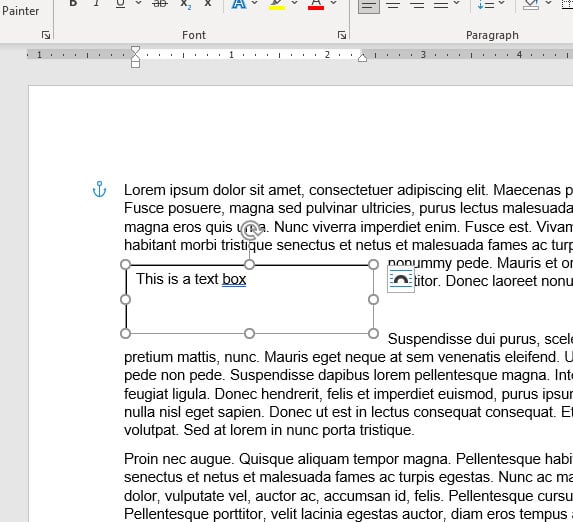
Step 2: Click on the text box border, which will select the entire object.
If you are having trouble clicking on the text box border, you can also choose to click inside of the text box.
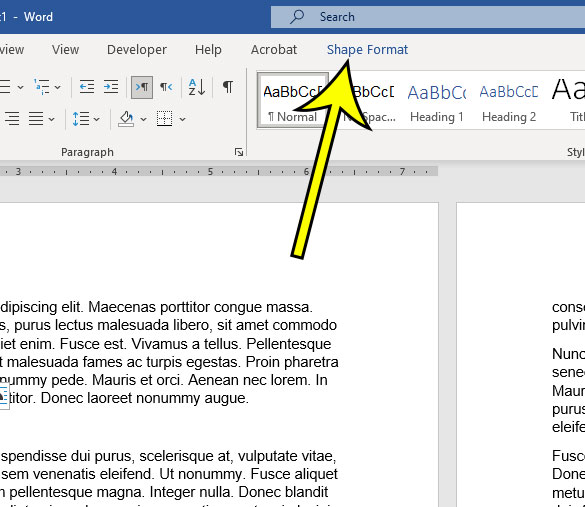
Step 3: Select the Shape Format tab at the top of the window.
Note that this tab is only visible when the text box is selected, so you won’t see it when you are editing the body of your document.
Step 4: Click the Shape Outline button in the Shape Styles group in the ribbon, then choose the No Outline option from the drop down.

Now that you know how to remove text box border in Word you will be able to fix issues that arise in your document related to text box borders.
You will still see a line around the text box, as it is currently selected. However, when you click on another part of the document, that line should be gone, allowing you to see how the text box will look now that you have eliminated the border.
More Information on How to Remove Border from Text Box in Word
While the steps in this tutorial discuss removing the border completely, you can use these same steps if you want to use a different color for your border.
The text box border can be further customized from this menu by selecting the Weight, Sketched, or Dashes option. This will change things such as the style of the text box border, or its thickness. There is also an option on the Shape Outlines menu that says More Outline Colors, which you can choose if you don’t see the color that you want to use for the border.
Word also gives you the option to adjust the fill color of your text box. By default the text box background is white, but you can make it almost any other color that you would like. This is accomplished by going to Shape Format > Shape Fill then selecting the desired background color. If you do change the background color, you may also need to change the text color. You can do this by selecting the text inside of the text box, then using the Font formatting options found on the Home tab.
if you need to do something other than removing the border from a text box, then you will find a lot of options on the Format Shape dialog box. you can open this menu by clicking the small Format Shape button that appears at the bottom-right of the Shape Styles group in the ribbon.
Here you will find ways to customize your shape or text box, including:
- Changing the line style
- Adjusting the line weight
- Changing the shape border
- Changing the vertical alignment or text direction
- Using different margins for the content inside of the text box
- Adding various effects to the text box like shadow, reflection, glow soft edges, and more
- Applying or removing a fill color from the text box
There is even a tab for Text Options that let you select the formatting and layout settings for the text that is inside of the text box.
When you combine all of these different customization options along with the ability to create a custom border or remove a border from a text box then you can see just how many options there are for you to format the text box the way that you want.
If you need to change multiple text boxes at the same time inside of your document, then you can do that by clicking the first text box, then hold Ctrl key on your keyboard, and clicking on the additional text boxes that you want to change.
Note that doing this will cause you to apply the same changes to each of the selected text boxes. So if you give a different border style from the Borders tab then it will apply that effect to each of the selected text boxes.

Kermit Matthews is a freelance writer based in Philadelphia, Pennsylvania with more than a decade of experience writing technology guides. He has a Bachelor’s and Master’s degree in Computer Science and has spent much of his professional career in IT management.
He specializes in writing content about iPhones, Android devices, Microsoft Office, and many other popular applications and devices.

