While many applications include features that can help to fix spelling errors, you might also want something that can identify grammar problems in your Google Docs file.
Fortunately, you don’t need to install any extra apps or use any kind of plugin or extension, as the feature is already available in the application.
Our tutorial below will show you how to perform a Google Docs grammar check.
How to Enable the Grammar Check in Google Docs
- Open your Google Docs document in Google Drive.
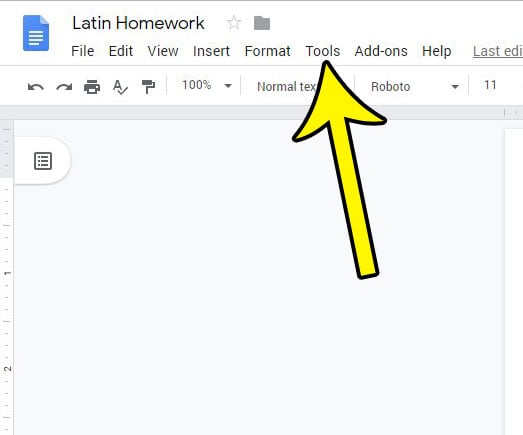
- Select the Tools tab at the top of the window.
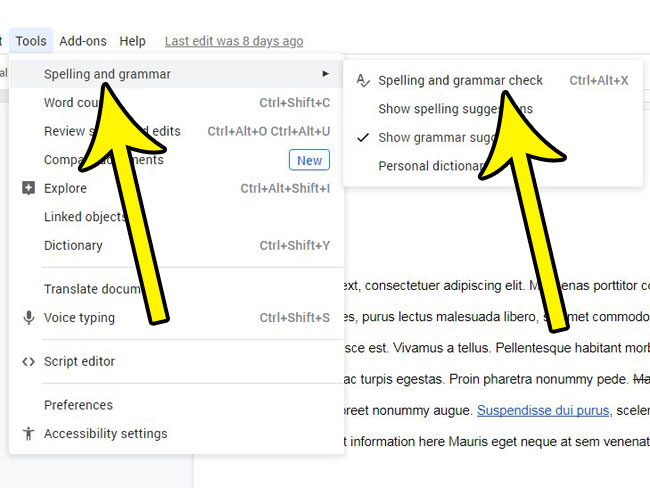
- Choose the Spelling and grammar option, then click Spelling and grammar check.
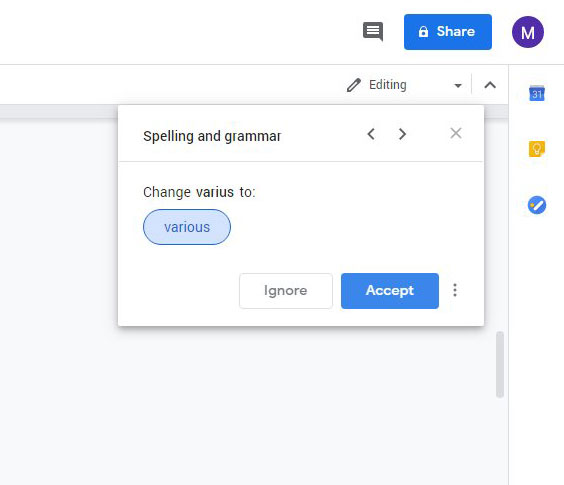
- Click the Ignore or Accept button for each identified issue.
The steps in this article are going to show you how to perform a grammar check in Google Docs. This tool will scan through the text in your document to identify any grammar issues, then will provide grammar suggestions to resolve identified issues.
If you have a free Google Account or you are a G Suite user, the ability to use the Google Apps like Sheets, Docs, and Slides is incredibly useful. This set of office productivity tools provides a strong alternative to comparable paid options, like Microsoft Office, and includes many of the same features you would find in their applications.
One such tool is the grammar checker, which can help find spelling and grammatical errors. Simply launch the tool and elect whether to make a suggested change, or ignore it. Our tutorial below will show you where to find this tool so that you can start using Google Docs grammar checking on your files.
How to Get Grammar Suggestions with the Google Docs Grammar Checker
The steps in this article were performed in the desktop version of the Google Chrome Web browser, but will also work in other desktop Web browsers like Firefox or Edge. You can also search for grammatical errors in the iOS and Android apps, although the method for doing so is slightly different.
Step 1: Sign into your Google Drive at https://drive.google.com and open the document you wish to check.
Step 2: Click the Tools tab at the top of the window.

Step 3: Select the Spelling and grammar option, then choose Spelling and grammar check.

Step 4: Click the Accept button to make the suggested change, or click Ignore to keep the current content.

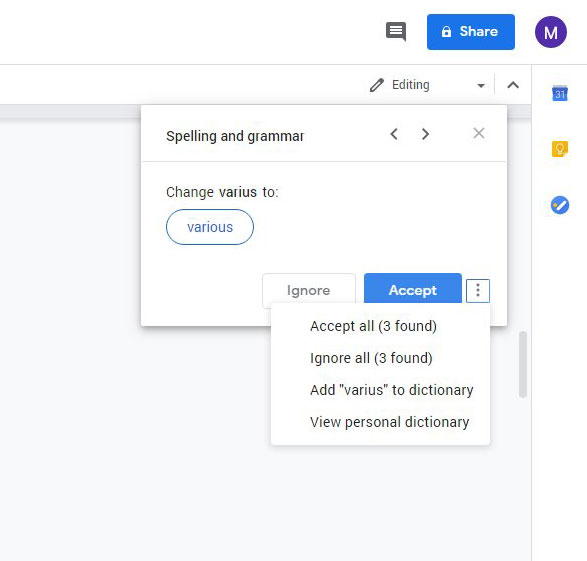
Note that you can also click the button with three dots to the right of the Accept button to get some additional options, including an Accept All, Ignore All, and Add to Dictionary option.

Additional Notes on Spell Check and Grammar Check in Google Docs
- When you launch the spelling and grammar checker, there are options on that menu that let you select whether you would like to see spelling suggestions and/or grammar suggestions.
- You can use the keyboard shortcut Ctrl + Alt + X as an alternative to launch the spelling and grammar tool.
- G Suite users have access to a more powerful spelling and grammar checker that leverages machine learning to identify mistakes. These machine translation techniques take advantage of artificial intelligence to identify mistakes, even while you are actively typing. Note that this version is different than the one available to users with free Google Accounts.
- There are third-party alternatives to the default spelling and grammar checker, such as Grammarly. Many of these tools are more adept at finding errors, but may come at an additional cost.
- The machine learning version only provides its advanced grammar correction and spelling suggestions to G Suite users, whether you are on G Suite Basic or Enterprise. This version is turned on in those accounts by default, and is touted to have a wider range of grammatical concepts that it uses to identify errors and grammar mistakes.
Need to add text to your document outside of the regular document body? Find out how to add a text box in Google Docs and create a moveable object where you can add more text to your document.
How to Switch to 1-Inch Margins in Google Docs
Setting the margins is an important step in the document layout. The usage of margins aids in the appropriate alignment and organization of your page’s text and other content. Margin settings in Google Docs are simple to implement. In this tutorial, we’ll teach you how to set one-inch wide margins in Google Docs.
Step 1: Open Google Docs.
To begin, open a new or existing Google Docs document. You can begin a new document by selecting “Blank” or “New Document” from the homepage.
Step 2: Select the Page Setup option from the dropdown menu.
To change the margins in Google Docs, go to the Page Setup option. You can do this by selecting “Page Setup” from the “File” menu in the top-left corner of the screen. You can also launch the Page Setup menu by pressing “Ctrl+Shift+P” (Windows) or “Cmd+Shift+P” (Mac).
Step 3: Establishing Margins
You can change the margins for your page under the Page Setup menu. The “Margins” section provides four options: top, bottom, left, and right. Simply enter “1” next to “Top,” “Bottom,” “Left,” and “Right” to set one-inch margins on all four sides. The margins can also be adjusted using the up and down arrows.
Step 4: Press the “OK” button.
After you’ve decided on your margins, click the “OK” button to save your changes. All sides of your document will now have 1 inch margins.
If you want more information about using one-inch margins in your Google Docs document, then you can read this guide and see how to apply that setting.
Additional Directions
Simply move the margin lines on the ruler at the top and left of the document to change the margins. To change the margin size, simply click and drag the margin line.
To change the margins for a specific section of your document, select the text you want to change, enter the Page Setup menu, and then pick “Apply to [Selected text]” under the “Margins” section.
If the margins of a document are modified while it still has content, the content may move. After making any necessary margin adjustments, double-check the document’s layout to confirm that everything is properly positioned.
Finally, changing the margins in Google Docs to one inch is a simple task. You may ensure that your page is correctly structured with even margins on all sides by following the preceding instructions.

Kermit Matthews is a freelance writer based in Philadelphia, Pennsylvania with more than a decade of experience writing technology guides. He has a Bachelor’s and Master’s degree in Computer Science and has spent much of his professional career in IT management.
He specializes in writing content about iPhones, Android devices, Microsoft Office, and many other popular applications and devices.