When you don’t adjust the print settings for a spreadsheet in Excel, it’s going to align to the left side of the printed page.
This may not look professional to you, especially if it’s not a lot of data.
Our tutorial below will show you how to center a worksheet horizontally in Excel by adjusting one of the page settings.
How to Center Horizontally and Vertically in Excel 2010 When Printing
- Click the Page Layout tab.
- Click the Page Setup button at the bottom-right of the Page Setup section in the ribbon.
- Select the Margins tab.
- Check the box to the left of Horizontally or Vertically, or both.
Our article continues below with additional information to help you center the worksheet horizontally on the page or vertically on the page in Excel, including pictures of these steps.
Have you ever printed a spreadsheet in Excel, and it was aligned at the left side of the sheet?
In some cases, this is perfectly fine, but in other situations, this could look bad or unprofessional. This can leave you trying to learn how to center a worksheet horizontally in Excel.
If you need to know how to center worksheets in Excel, then open your spreadsheet, click Page Layout, click the Page Setup launcher tool, choose Margins, then check the box next to Horizontally.
Printing has long been one of the more annoying problems when working with Excel. Whether you want gridlines, or page numbers, or to fit all of your data on one page, it can be tough to find all of the settings that you would like to incorporate into your printed document’s layout.
Fortunately Excel 2010 has a number of different ways that you can customize the appearance of your printed spreadsheets, including a setting where you can center your worksheet horizontally and vertically. Our tutorial below will show you two ways to get to the menu where you are able to perform this centering.
How to Print a Centered Worksheet in Excel 2010 (Guide with Pictures)
The steps in this article were performed in Microsoft Excel 2010, but will work in other newer versions of Excel as well. Note that you have the option to center horizontally, vertically, or both.
Step 1: Open the spreadsheet that you wish to center in Excel 2010.
Step 2: Select the Page Layout tab at the top of the window.
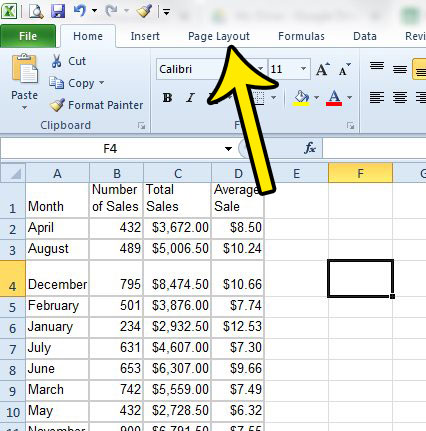
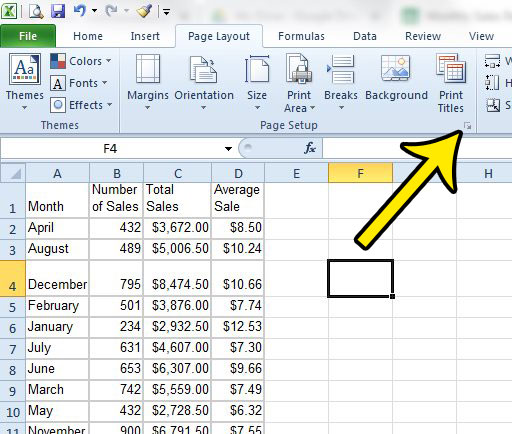
Step 3: Click the small Page Setup button at the bottom-right corner of the Page Setup section in the ribbon.
This is going to open the Page Setup dialog box, which is an incredibly useful menu that can help you to make a lot of the formatting changes that you need, especially when you need to print in Excel.
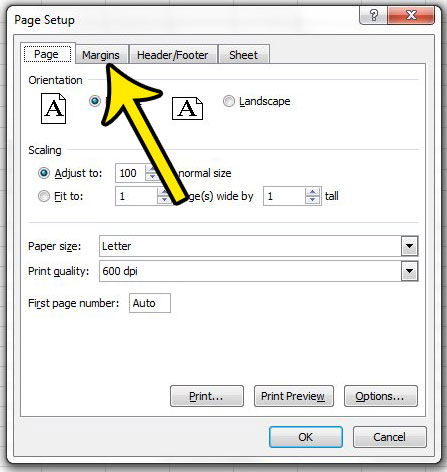
Step 4: Choose the Margins tab at the top of this window.
Step 5: Click the box to the left of Horizontally, Vertically, or both based on how you wish to center.
Note that this is also where you would go to set custom margins for your printed spreadsheet.
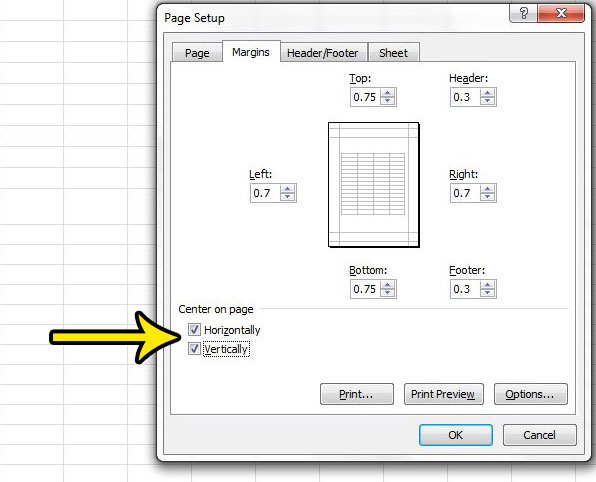
If you then press Ctrl + P on your keyboard or click the Print Preview button on this menu you will open the Print menu, where you will see a preview of the centered worksheet.
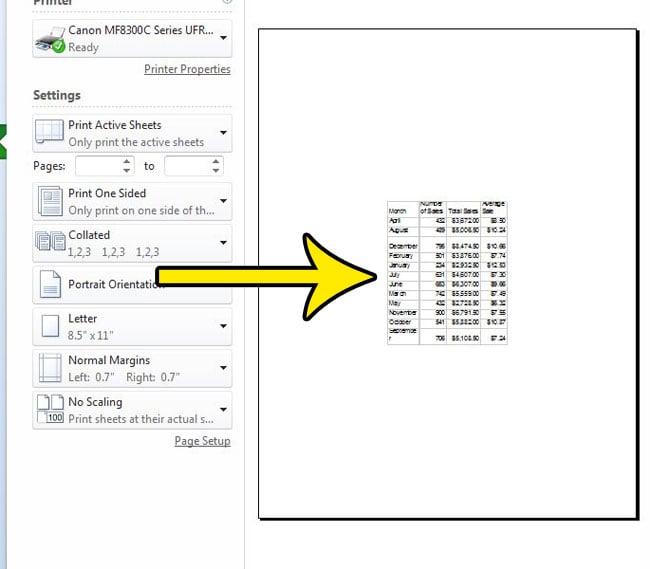
Alternate Method for Centering Horizontally and Vertically in Excel 2010
This method is very similar to the first method, we just go through the Margins option in the ribbon rather than through the Page Setup menu.
Step 1: Click the Page Layout tab at the top of the window.
Step 2: Click the Margins button, then choose the Custom Margins option at the bottom of the menu.
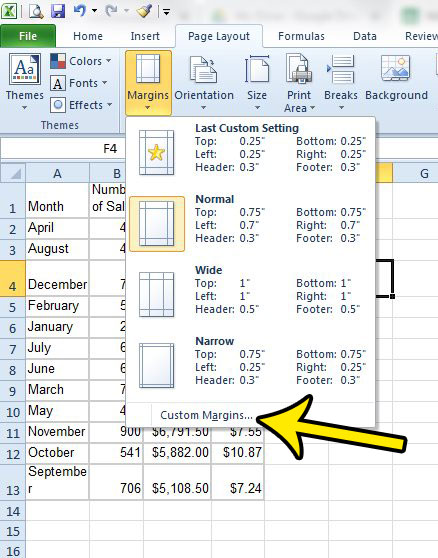
Step 3: Click the box to the left of the type of centering you wish to use.
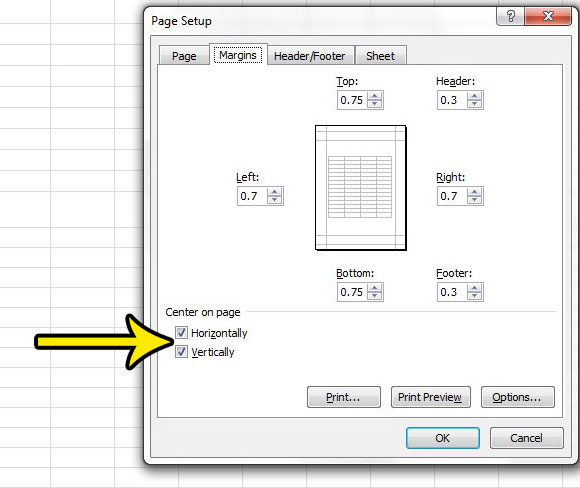
Note that completing the steps above will not affect the appearance of your spreadsheet when you are editing in Excel. This setting only affects the way that the spreadsheet prints.
If you would also like to center the data in your cells, simply select the cells that you want to center, then select one of the options in the Align section on the Home tab.
For more information on ways that you can make your printed spreadsheets look better, check out our Excel printing optimization guide and view some additional tips.
Center Worksheet in Excel Tips
You are going to have the option to center the printed worksheet horizontally, vertically, or both. This choice is going to depend on your own preferences, the size of the worksheet, and simply how the data looks when you go to print it.
It’s helpful to take advantage of the Print Preview window that is shown when you go to the Print menu from the File tab, or when you press Ctrl + P to go to it directly. This lets you see how everything will look before you potentially waste paper and time printing something that you don’t like. You might also discover that the desired print layout occurs when you only use one of those print settings, or make another adjustment to one of the options on the Print menu.
There are a few page settings accessible from the Page Setup dialog box launcher that you might also want to familiarize yourself with. If you click the Page tab at the top left corner of the Page Setup window you will be able to adjust the scaling and orientation of your document. You can also choose a different paper size from the drop down menu.
We’ve already explored the Margins tab where we can switch between normal margins or click custom margins that we want to apply to our printed Excel sheet. This is also where we would go to center worksheets horizontally or vertically.
The Header/Footer tab includes options for you to define header and footer page section information, as well as select whether you have a different first page or not.
The Sheet tab lets you define rows to repeat at the top of the page, or columns to repeat at the left side of the page. You can also elect whether to print gridlines, or only print in black and white.
Excel does not center worksheets in any way by default, nor will it remember the choices that you make with your previous file. You are going to need to make this adjustment for each new spreadsheet that you edit in the application.
The centering choice that you make will only apply to the current worksheet. It will not affect the rest of the worksheet tabs in your workbook. You can apply changes to the entire workbook, however, if you hold down the Ctrl key on your keyboard and select all of the tabs before you apply the centering option.
Centering your worksheet using the steps in this guide is only going to center the entire worksheet as a unit on the printed page. This is not going to affect the centering of the data with your cells.
Conclusion
Hopefully, this article has provided you with more information on centering worksheets in Excel. Whether you want your print area centered horizontally or you want to center the worksheet horizontally or vertically, the page options available on the Page Setup window can help you to accomplish that.
Knowing where to find this print option in the future on the margin settings page can help to alleviate some of the stress that comes with trying to print a Microsoft Office spreadsheet.
That should allow you to focus less on these spreadsheet-based printing issues and focus more on the content and data in your worksheet.

Kermit Matthews is a freelance writer based in Philadelphia, Pennsylvania with more than a decade of experience writing technology guides. He has a Bachelor’s and Master’s degree in Computer Science and has spent much of his professional career in IT management.
He specializes in writing content about iPhones, Android devices, Microsoft Office, and many other popular applications and devices.