When you add columns to a Microsoft Word document there will be some space between the columns.
But you might not think there is enough space, especially as you add more than one additional column.
Luckily our line between columns Word guide can show you how to include a vertical line between columns to help make it easier to separate the text in the document.
How to Insert a Vertical Line Between Columns in Microsoft Word
- Open your document.
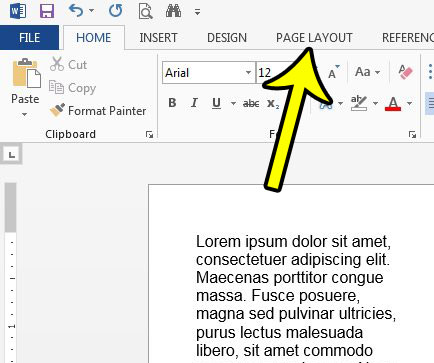
- Click the Page Layout tab.
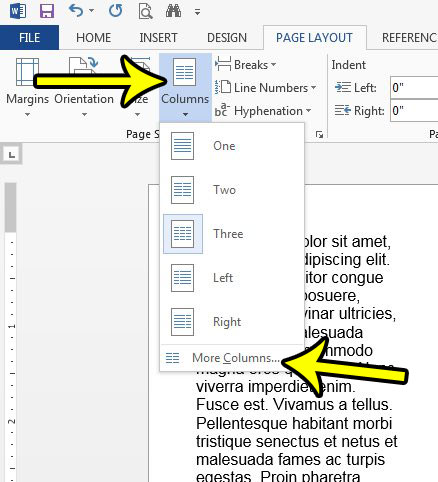
- Select Columns, then More Columns.
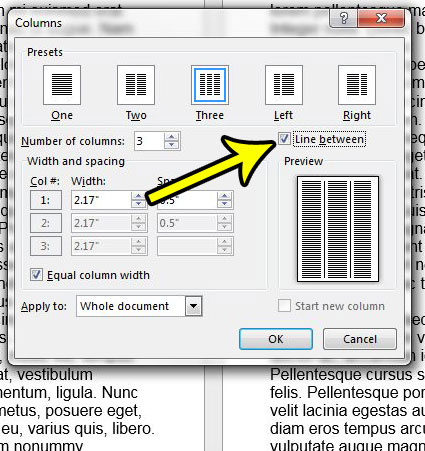
- Check the box next to Line between, then click OK.
Our line between columns Word article continues below with more information on adding lines between columns in Microsoft Word, including pictures of these steps.
Certain types of documents require columns. Most often these will be things like periodical articles or newsletters, but it’s a type of formatting that you can easily create in Microsoft Word. However, there won’t be any lines between these columns by default, which could leave you wondering how to insert lines between columns in Word.
While the default layout for a new document in Microsoft Word will fill the entire width of the page as you type and add content, some situations may arise where you need to add columns to your document.
But after you have formatted your document with columns, you may notice that the document seems difficult to read because your eyes naturally move from left to right as you read. One way to help with this is to put lines between your columns.
You can click here if you would like to learn more about strikethrough in Google Docs.
How to Display a Solid Line Between Columns in a Word Document (Guide with Pictures)
The steps in this article were performed in Microsoft Word 2013, but are similar in most other versions of Word as well. Note that this guide assumes that your document already contains columns. If not, you can format your document with columns by clicking the Page Layout tab, clicking the Columns button, then choosing the desired number of columns.
Step 1: Open your document in Microsoft Word.
Step 2: Select the Page Layout tab at the top of the window.

Step 3: Click the Columns button, then choose the More Columns option.

Step 4: Check the box to the left of Line between, then click the OK button.
When there is a check in the check box then you will be formatting columns with a vertical line between the first column, second column, and additional columns from this point forward.

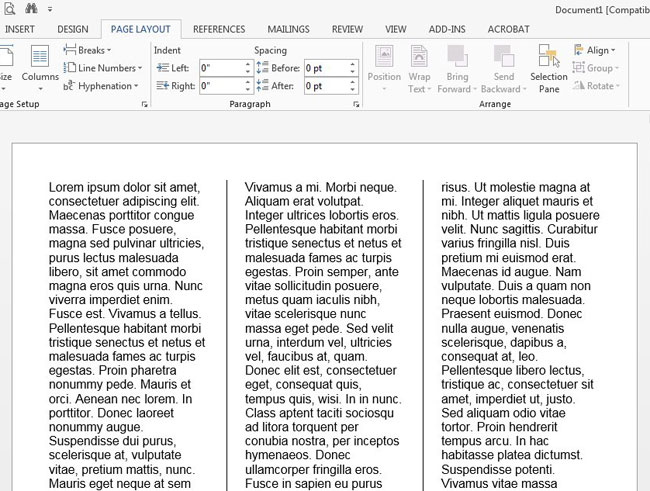
Your document should then look something like the image below.

Now that you are familiar with the line between columns Word method you will be able to add and remove lines between the columns in your document.
Did you add columns to your document, but you have too many columns now? Find out how to remove a column in Word if you would prefer to have fewer columns in your document.
How to Format Multiple Columns with the Columns Dialog Box in Word
When you select the More Columns option at the bottom of the Columns dropdown menu you are opening a new window called the Columns dialog box.
One of the options on this menu lets you specify the width and spacing for each column in your document. You can use these fields if you want some columns to be thin and some to be wide, or if there is too little or too much space between the columns in the document.
You can get to this menu by going to Page Layout > Columns > More Columns > then unchecking the box to the left of Equal column width. All of the different fields under Width and spacing should not be editable, allowing you to specify column width and column spacing for each column in the document.
How to Insert a Column Break in Microsoft Word
Once you have added columns to your document things will behave a little differently than when you were just editing standard document content in a single-column document.
If you need to stop adding information to one of your columns and start in the next one, then you can do this most efficiently by adding a column break.
You can insert a column break in Word by clicking at the point in the document where you want to add the column break, then going to the Page Layout tab, clicking the Breaks button in the Page Setup group of the ribbon, then selecting the Column option under Page Breaks.
If you need to remove column breaks from the document you can click the Home tab at the top of the window, then click the Show/Hide button in the Paragraph group of the ribbon. This is going to display the document format and column format formatting marks. You can then click at the top of the column after the column break, then press the Backspace key.
This will delete the two dots at the bottom of the previous column that identifies the insertion point of the column break.
More Information on How to Add Lines Between Columns in Word 2013
Note that you aren’t able to specify the columns between which you add the lines. It’s either a line between every column or no lines between any columns. You can’t choose to have a line between one column but no line between other columns.
The steps in this article were performed in Microsoft Word 2013, but will also work in most other versions of Microsoft Word that include a navigational ribbon, such as Microsoft Office 2016, or 2019.
When you click the More Columns button and open the Columns dialog box there are several options on that menu that you can use to customize the column layout in your document. These column formatting options include:
- Column presents for One, Two, or Three columns, as well as Left and Right options that have one thick and one thin column.
- Number of columns
- Line between
- Width and spacing for individual columns
- Equal column width
- Apply to
- Start new column
In order to add vertical lines between one column and the next column you need to have at least two columns in the document.
If you don’t want to use columns for the whole document then you can add a section break from the Page layout > Breaks menu. Now if you click inside a section of the document and change something about the columns, then only the pages in the current section will be affected. Other pages in other sections will maintain their current column formatting.
Additional Reading

Kermit Matthews is a freelance writer based in Philadelphia, Pennsylvania with more than a decade of experience writing technology guides. He has a Bachelor’s and Master’s degree in Computer Science and has spent much of his professional career in IT management.
He specializes in writing content about iPhones, Android devices, Microsoft Office, and many other popular applications and devices.