Finding the right font for a creative document like a flyer or newsletter can be tough. The standard fonts may not present the appearance that you want, which can leave you wondering how to add a new font to Word 2013.
Default Windows installations will include a fairly large library of fonts that you can use for your Word documents, but you may eventually find that you need a font which isn’t already installed on your computer.
Fortunately there are several free online font resources where you can find and install new fonts that you can then use in your Word 2013 documents. New fonts are installed in Windows, which then makes them available to the programs on your computer that are able to modify their fonts.
Our guide below will show you what to do with a downloaded zip file that contains a font you’ve chosen so that you can use that font when editing documents in Word.
How to Add a New Font in Microsoft Word 2013
- Find the font zip file.
- Right-click the file and choose Extract All.
- Click Extract.
- Right-click the extracted font file and select Install.
Our article continues below with additional information on adding new fonts in Microsoft Word, including pictures for these steps.
How to Install a New Font in Word 2013 (Guide with Pictures)
The steps below will assume that you have already found a new font that you would like to use in a Word 2013 document, but that you are having difficulty getting that font added to your computer. If you do not yet have a font that you wish to add to Word 2013, then you can go to Google Fonts to find and download a free one.
Step 1: Locate the font on your computer.
It should be inside a zip file if you downloaded it from one of the popular online font companies.
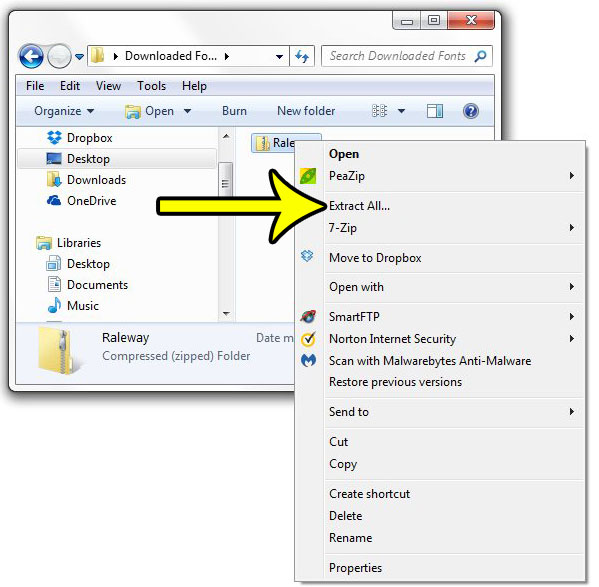
Step 2: Right-click the font zip file, then click the Extract all button.

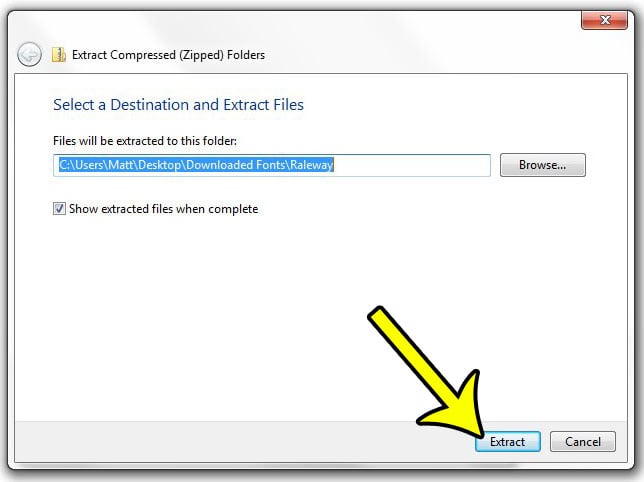
Step 3: Click the Extract button at the bottom-right corner of the screen.

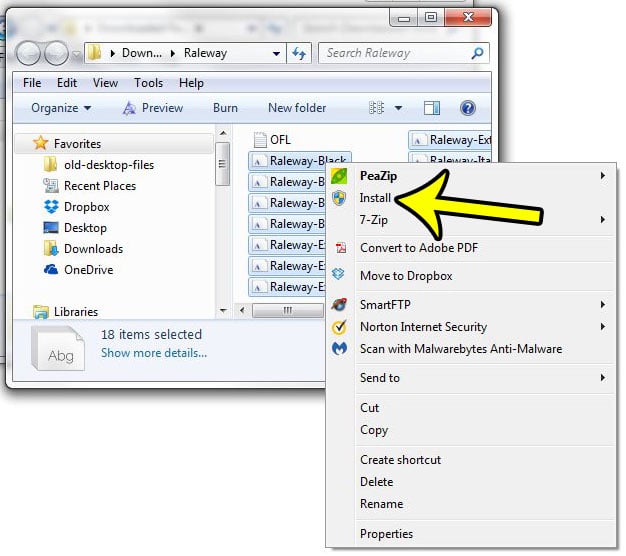
Step 4: Right-click on the extracted font file, then click the Install option.
If there are multiple font files in this folder, you can hold down the Ctrl key on your keyboard to select multiple files.

You can now open Word 2013 (or close it and reopen it if it was already open) and you should see your newly installed font in the list of fonts in the ribbon.
Many other applications on your computer, such as Microsoft Excel and Microsoft Powerpoint, also use the default Windows font library. This means that any font installed for Word will be available in those other programs as well.
Would you like to change the font for an entire document, now that you have installed a new font that you wanted? Learn how to select your whole document and make formatting changes to it in Word 2013 and save yourself a lot of editing time.
Additional Reading

Kermit Matthews is a freelance writer based in Philadelphia, Pennsylvania with more than a decade of experience writing technology guides. He has a Bachelor’s and Master’s degree in Computer Science and has spent much of his professional career in IT management.
He specializes in writing content about iPhones, Android devices, Microsoft Office, and many other popular applications and devices.