Many of the papers that you write for school or work will simply use the default document layout options for Microsoft Word. Typically you will consider the page margins, font, and line spacing if you need to make formatting adjustments. But one of the default options for this document is that it has one column. But you might need to add a column in Word if you are creating an article or newsletter that requires a multiple-column layout.
Learning how to add a column in Word 2013 is helpful if you are creating a document that is better suited to a multi-column format. This is common for newsletters and other similar publications that are typically not distributed in the default single-column format that Word generates.
Our guide below will show you how to add a column to your document, whether it is a new or existing one. You can specify the number of columns that you would like in your document, and you can easily change that number if you decide later that the current selection is not ideal.
How to Add a Column in a Word 2013 Document
- Open the document.
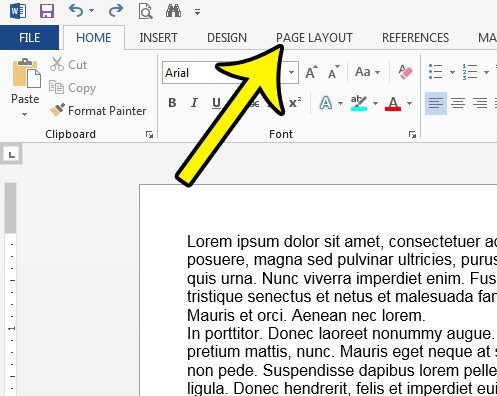
- Click the Page Layout tab.
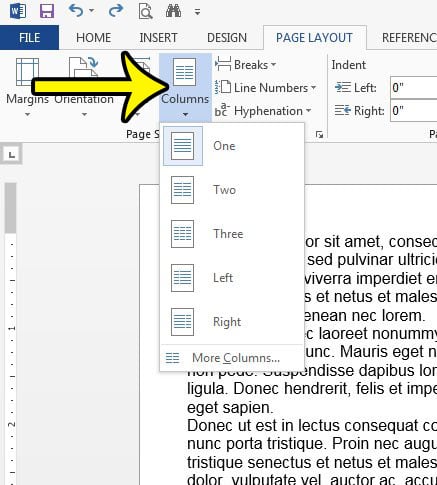
- Click Columns, then choose the desired number of columns.
Our article continues below with additional information on adding a column in Word, including pictures of these steps.
How to Insert a Column in Word 2013 (Guide with Pictures)
The steps in this guide will show you how to format your entire document with your new column structure. This means that the entire document will have the number of columns that you select in the last step. However, if you only want to add a column to part of your document, then you can do so using the information in the tip at the end of this guide.
Step 1: Open your document in Word 2013.
Step 2: Click the Page Layout tab at the top of the window.

Step 3: Click the Columns button, then select the number of columns that you want in your document.
Word will automatically reformat the entire document to have that number of columns.

Our article continues below with additional information on working with columns in Word 2013.
How to Add a Column to a Table in Word 2013
If you aren’t interested in adding a column to the entire document, then it’s possible that you simply want to add a column to a table in your document. Fortunately, this is possible with the assistance of some table-specific tabs that appear at the top of the Word window.
- Open the document.
- Click inside a cell in a column next to where you want the new column.
- Select the Layout tab at the top of the window.
- Choose the Insert Left or Insert Right option to add a column.
If you need to delete a column from a table in the document, simply click in a cell in the column to delete, choose the Layout tab, click the Delete button, then choose Delete Columns.
How to Open the Columns Dialog Box
The way to have the most control over the column layout of your document is with the help of the Columns dialog box.
You can open this dialog box by going to Insert > Columns > More Columns.
Here you will see a variety of ways to affect the layout of document columns.
More Information on How to Add a Column in Word 2013
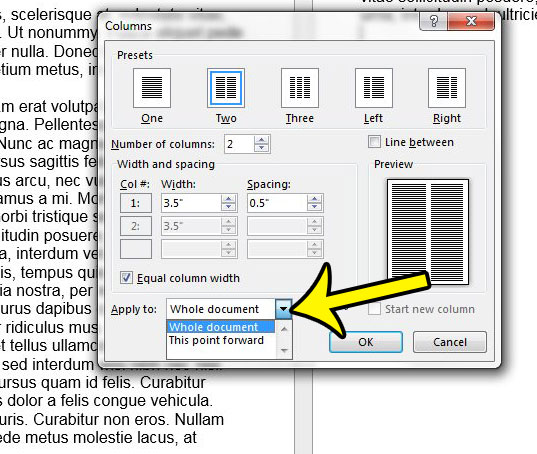
If you only want to add additional columns to your document after the existing content, then you can do so by clicking at the end of the current content, clicking the Columns button in step 3, then clicking the More Columns option. You can then adjust your column settings on this menu as needed, making sure to click the Apply to dropdown menu at the bottom of the window and choosing the This point forward option.

Note that this Columns dialog box includes a number of different ways that you can format the columns in your document.
- Number of columns – enter the desired number of columns for your document.
- Width and spacing – enter the desired width for your columns, as well as the spacing. This is helpful if you need your columns to have different sizes.
- Equal column width – check this box if you want all of the columns in the document to have the same width. You can also uncheck this box if you want to manually define different column widths.
- Line between – check this box if you would like to include vertical lines between your document columns.
At the bottom of the Columns dropdown menu are options for “Left” and “Right.” These column options create columns that are not the same size. The “Left” option will create two columns, but the leftmost column is smaller. The “Right” option also creates two columns, but the rightmost column is smaller.
If you want to remove a column from your document you can use these same steps, you will just be selecting a number of columns that is fewer than the current number.
Changing the number of columns in a document that already has content will have a big effect on the layout of that content. Be sure to read through everything after adding or removing a column to make sure that nothing has been impacted negatively.
Much like a page break that will automatically force your document to the next page, you can use something called column breaks to force content to the next column. You can find this by going to Layout > Breaks and choosing the Column option from the drop down menu to add a column break to the document. Note that this break will be added wherever the mouse cursor is currently located, so it’s best to position it at the desired location before you add the break.
Do you need to remove an existing column from a document? Learn how to remove a column in Word 2013 if you would like to have fewer columns in a document.
Additional Reading

Kermit Matthews is a freelance writer based in Philadelphia, Pennsylvania with more than a decade of experience writing technology guides. He has a Bachelor’s and Master’s degree in Computer Science and has spent much of his professional career in IT management.
He specializes in writing content about iPhones, Android devices, Microsoft Office, and many other popular applications and devices.