Microsoft Powerpoint offers a large selection of options for adding objects to your slides. One of these options is found on the Insert menu and you can use it to add shapes to your presentation. To insert an arrow in Microsoft Powerpoint you will need to go to the Insert tab, click the Shapes button, then choose an arrow and draw it on your slide.
There are many different ways to create a slideshow in Powerpoint 2013. But many of the ways that you might choose will require you to use some form of list or sequence of ideas where you may want to highlight one specifically.
An effective way to do this is with a large arrow that catches the attention of your audience. You may have previously used an image of an arrow for this purpose, but you can actually insert a custom arrow into your slideshow using the drawing tools available in Powerpoint 2013. Our tutorial below will show you how to draw and customize an arrow on one of your presentation slides.
How to Add an Arrow to a Slideshow in Powerpoint 2013
- Open your slideshow.
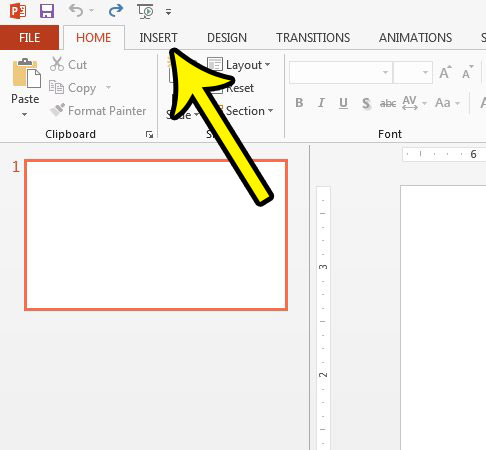
- Click the Insert tab.
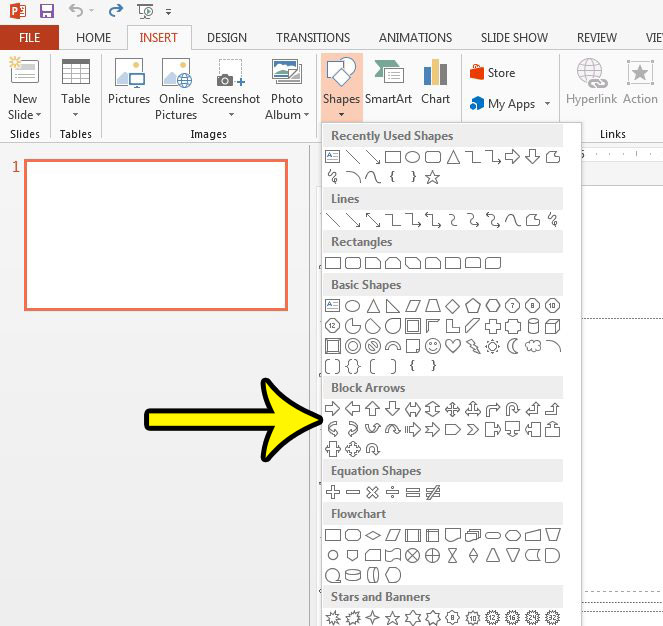
- Click the Shapes button, then select an arrow.
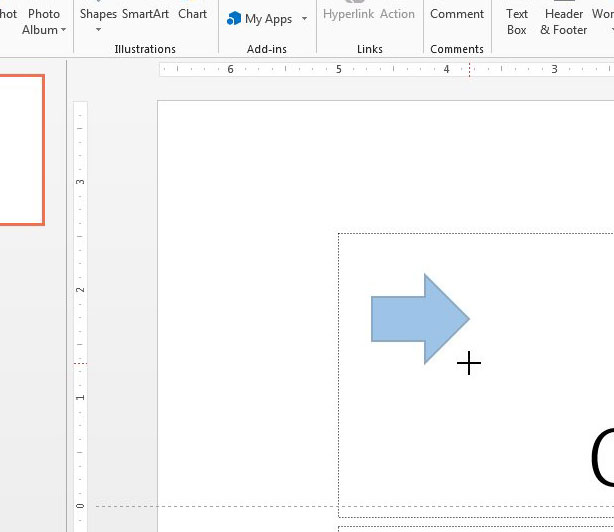
- Draw the arrow on your slide.
Our guide continues below with additional information on inserting arrows in Powerpoint, including pictures of these steps.
How to Draw a Powerpoint Arrow (Guide with Pictures)
The steps in this article will show you how to insert an arrow shape into a slide of your Powerpoint 2013 presentation. You will be able to adjust the size, fill color, outline color, and add some effects to the arrow.
Step 1: Open your presentation in Powerpoint 2013.
Step 2: Click the Insert tab at the top of the window.

Step 3: Click the Shapes button in the Illustrations section of the ribbon, then select the desired arrow shape from the Block Arrows section of the dropdown menu.

Step 3: Click and hold on the slide, then drag your mouse to draw the arrow. Once it’s the correct size, release your mouse button.

Our article continues below with additional discussion on adding arrows to Powerpoint slideshows.
More Information on How to Add Arrows in Powerpoint
With the arrow still selected, click the Shape Fill button to choose a color, the Shape Outline button to choose an outline color, and the Shape Effects button for some additional options for customizing the arrow.

If you don’t see those options in the Shape Styles section of the ribbon, then you will need to click the Drawing Tools > Format tab at the top of the window first.
While you can create arrows on a Powerpoint slide by utilizing the basic arrow shape found on the Shapes menu, you may be interested in trying out some other arrow shapes.
You can also create a straight arrow by going to Insert > Shapes and choosing one of the line options that includes an arrowhead. These line arrow options can also be customized from the Format Shape pane at the top of the window. If you want to include arrows connecting shapes then you can select one of these connector arrow options and attach them to other shapes on your slide. These can be effective for things like flowcharts where you need to indicate a series of events graphically.
If you want to create curved arrow shapes then you can do so using some of the curved arrow shapes that appear in the Arrows section of the Shapes dropdown menu. These can look pretty cool, and almost 3D, so they can be useful additions to your slides. There are a handful of different curved arrows, so try out a couple of them and see if you prefer one for your current slideshow.
Does your presentation end on a black screen, but you would prefer it to end on the last slide of your presentation? Learn how to change the ending setting for a slideshow if you are using a last slide as something that you want to leave up on the screen.
Additional Reading

Kermit Matthews is a freelance writer based in Philadelphia, Pennsylvania with more than a decade of experience writing technology guides. He has a Bachelor’s and Master’s degree in Computer Science and has spent much of his professional career in IT management.
He specializes in writing content about iPhones, Android devices, Microsoft Office, and many other popular applications and devices.